Autostart AppImage Applications in Linux

One of the main downside of using AppImages is the lack of desktop integration. This can be achived using AppImage Launcher tool.
Another problematic part is the lack of support for autostarting an AppImage application when the system restarts.
With some effort, you can achieve that, too.
The method involves twp steps:
- Creating a desktop file for the application
- Adding this desktop file to autostart application list
Let me show you the process in detail.
Step 1: Create a desktop file
Desktop files are text files that contain metadata about applications, such as their name, icon, and the command to run them.
These files are stored in specific locations, and the system menu uses them to allow users to launch applications from the menu.
For user-installed applications, the desktop file is typically stored in ~/.local/share/applications.
Before you explore autostarting an AppImage file, let’s first create a desktop file for your AppImage package.
Method 1: Using AppImage Launcher
AppImageLauncher is a handy tool that integrates AppImages with your Linux system. This way, you can find the AppImage apps in the system menu.
Although, AppImage Launcher hasn’t see a new release in almost three years, it still works.
For Ubuntu and other Debian-based systems, you can use the deb package to install AppImage Launcher.
First, go to the releases page and download the deb file.
Then install the deb file to your system.
If you are an Arch Linux user, you can install AppImageLauncher from AUR using an AUR helper like Yay.
yay -S appimagelauncherThere are release files for Fedora on the official releases page.
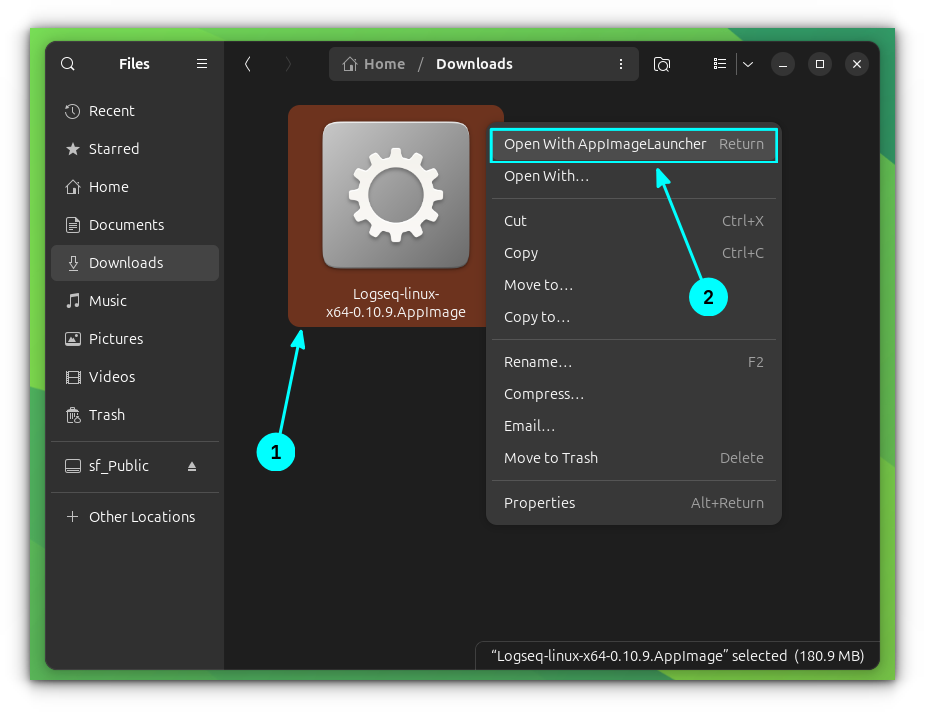
Once AppImageLauncher is installed, right-click on an AppImage app file and select “Open with AppImageLauncher”.

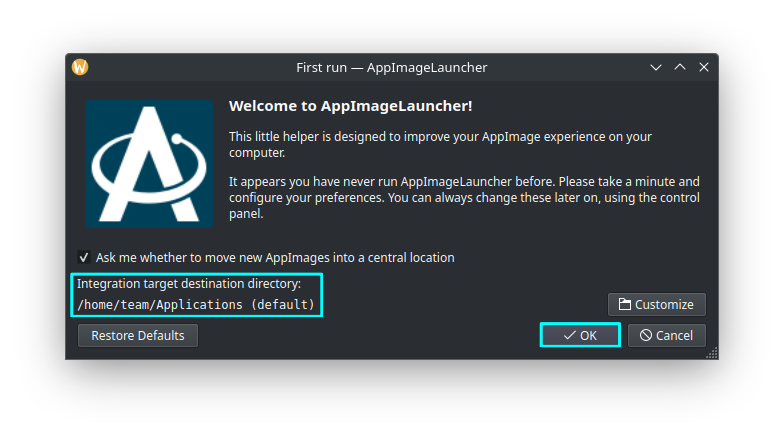
For the first time, it will ask you to select a centralized location. Go for the default (~/Applications). Click OK. Now, this is where all your AppImage files will be stored.

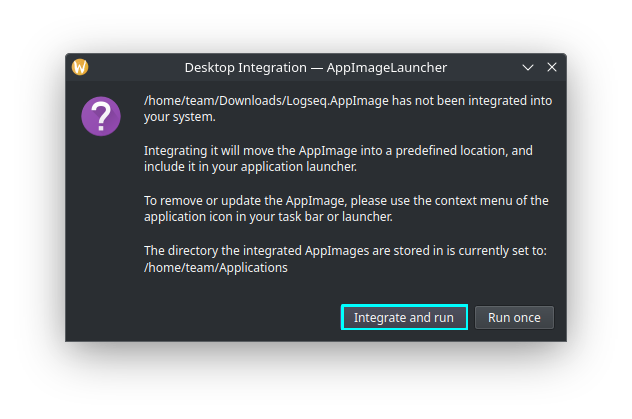
Now, in the next window, chose “Integrate and Run”.

That’s it. Your AppImage is now integrated to your system. You can now find the app you just ran with AppImage launcher in the system menu.
And it creates the required desktop file which is located at ~/.local/share/application.
Method 2: Creating desktop file manually
If you do not want to use AppImage Launcher, you can also create a desktop file manually.
Create a file called <your-app-name>.desktop in ~/.local/share/applications. For example, if you are using ClickUp, name it ~/.local/share/applications/clickup.desktop
Inside this file, add the following lines in this manner:
[Desktop Entry]
Type=Application
Name=Logseq
Comment=A Note taking and Knowledge Management Application
Exec=/home/$USER/Applications/Logseq.AppImage
Icon=/home/$USER/Applications/Images/Logseq.png
Terminal=false
Categories=Office;
This is a very minimal desktop file for an application.
Here, the fields should be filled with data:
- Replace the Name and Comment field with the name and description for your application.
- The Exec field should point to the absolute path of the AppImage file.
- The Icon field should point to the absolute path of the icon image file.
Terminal=falsemeans that the application does not require a terminal to run. For most graphical applications like AppImages, this is the desired setting.- Categories is where your Application will appear in the system menu.
Once done, save the file. That’s it. You have created a desktop file for the AppImage.
Step 2: Autostart the application
Once you have the AppImage desktop file ready, you can easily autostart the application by just copy and pasting it to the ~/.config/autostart directory.
Use the cp command to copy the file:
cp ~/.local/share/applications/Logseq.desktop ~/.config/autostartThere is a dedicated GUI tool to autostart programs in Ubuntu. You may use that, if you want.
Now, when you restart your system, the selected application will be auto-started.
Conclusion
Out of Snap, Flatpak and AppImages, I like AppImage for the protability feature. You download the AppImage file, make it executable and run it.
The ease of use comes with a few downsides. The desktop integration is the most obvious one. You cannot launch them from the system menu. However, this can be achived using the third-party AppImage Launcher tool.
Not able to auto start an AppImage app when the system starts is another pain point. With some effort, that can also be achieved.
I so wish that AppImage ecosystem provides these feature by default. I mean if a third party AppImage Launcher can allow desktop integration, it can surely be integrated by AppImage officialy. What do you think?
