How to Install AlmaLinux 8 Step by Step
The discontinuation of CentOS Linux by the CentOS Project in favor of CentOS Stream heralded a lot of uncertainty among developers and CentOS enthusiasts alike. In case you are behind the news, check out this announcement by CentOS Project. Many have opted to settle for other flavors such as Debian and OpenSUSE as a replacement given their stability and reliability which was a hallmark associated with CentOS.
The CloudLinux team stepped in and developed AlmaLinux to fill the gap left by the departure of CentOS Linux. Formerly known as Project Lenix, AlmaLinux is an open-source fork of RHEL 8 intended to fill the gap left by CentOS Linux. It promises to be completely free and is in fact binary compatible with RHEL8. In this guide, we show you how you can install AlmaLinux 8 step-by-step. If you have installed CentOS 8 / RHEL 8 before, then installing AlmaLinux will be a breeze given the similarities.
Without much further ado, let’s jump right in.
Prerequisites
Before you get started, here are a couple of things you need.
- A copy of the AlmaLinux DVD ISO image. If you intend to install with GUI, the image is quite huge – about 8.6 GB – and therefore ensure you have a superfast connection. If your connection is not so good, you can leave it overnight to download or when you are away. Alternatively, you can settle for the minimal ISO image which is only 1.8 GB
- Once you have downloaded your ISO image, grab a 16GB USB pen drive and make it bootable using the Rufus tool.
- Ensure that your system has a minimum of 15 GB of hard disk space & 2GB RAM.
- And of course, you will need a fast and stable internet connection to download the software packages during installation.
Step 1) Plug in the bootable USB drive
Right off the bat, plug the AlmaLinux bootable USB drive while your PC is still on and reboot. Be sure to check the BIOS settings and set the system to boot from the USB drive in the boot priority section and save the changes.
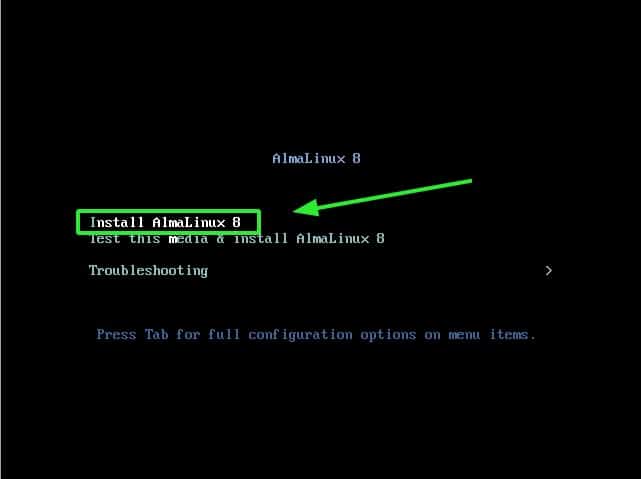
On the boot screen, press the Arrow Up key on your keyboard and press ENTER on the first option ‘Install AlmaLinux 8‘ to start the installation.
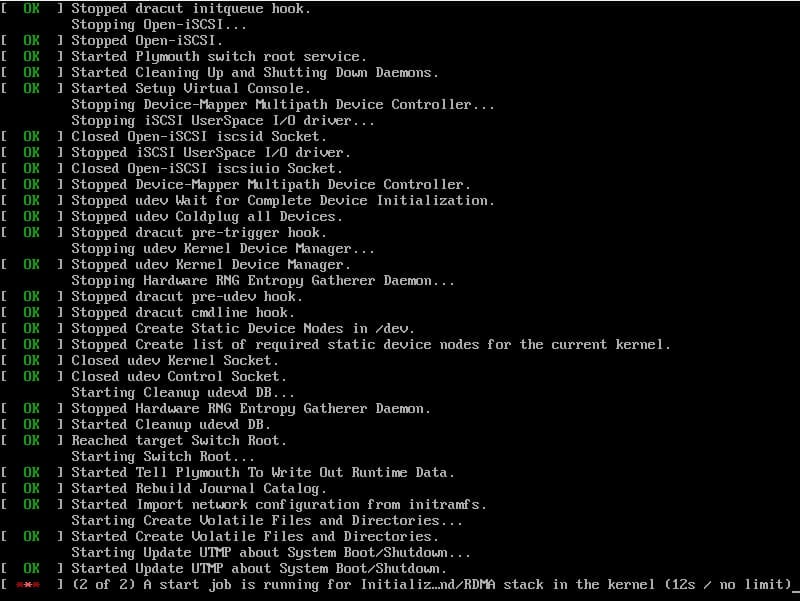
This will be shortly followed by the boot messages as shown. Just let the system initialize
Step 2) Select AlmaLinux 8 Installation Language
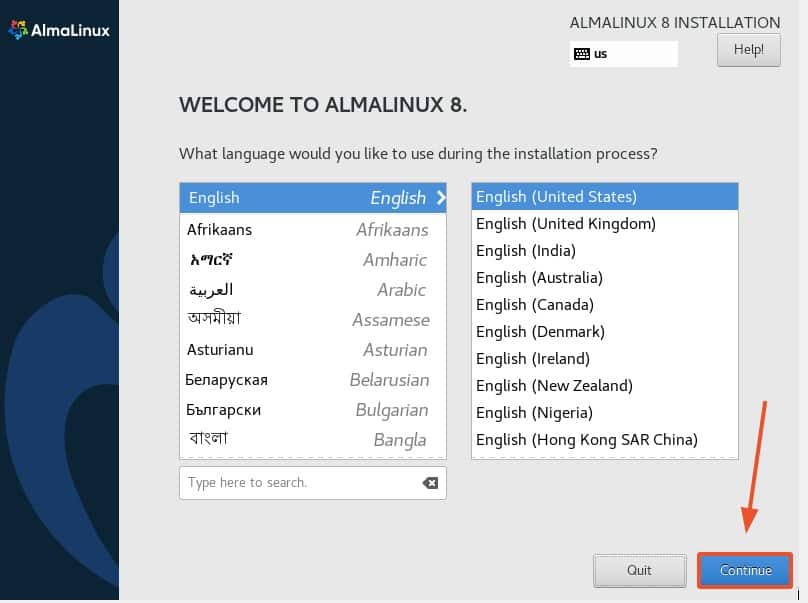
Once the system is done initializing, the AlmaLinux window will come into view as shown. Select your preferred installation language and click the ‘Continue’ button.
Step 3) Installation Summary of AlmaLinux
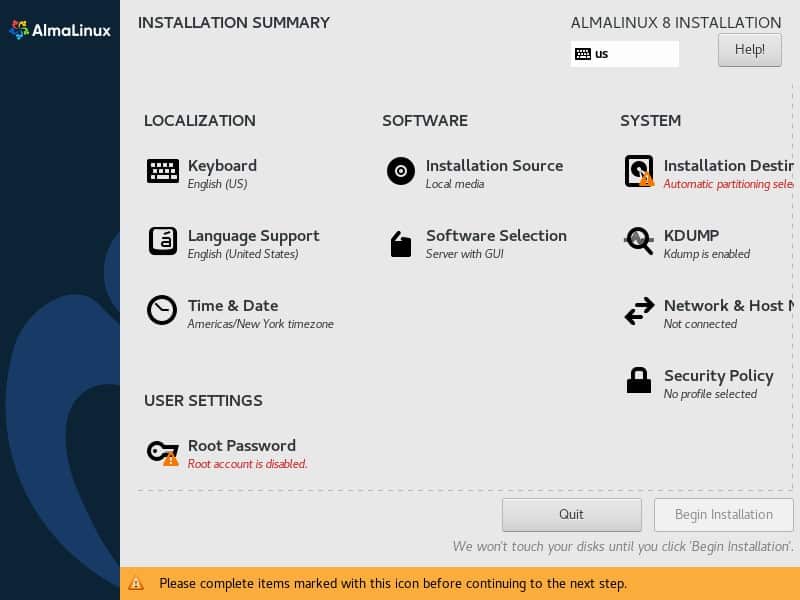
In the next step, you will get an installation summary presenting a list of settings that need to be configured before proceeding any further. We will begin by configuring the 4 crucial settings which are:
- Partitioning – Installation destination
- Network and hostname
- User Settings
- Software Selection
Step 4) Configure partitioning (Installation destination)
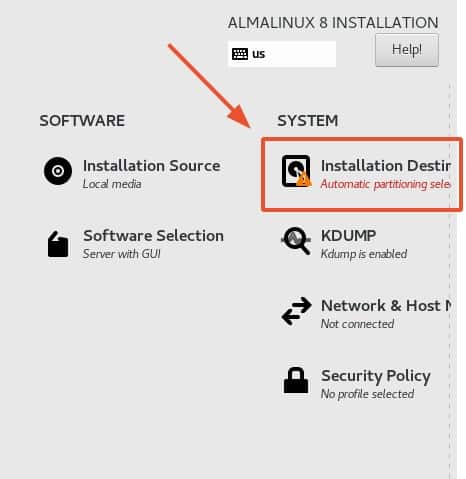
To configure partitioning, click on the ‘Installation Destination’ section as shown.
Just click on the hard drive and ensure that there’s a white check mark on the hard drive icon.
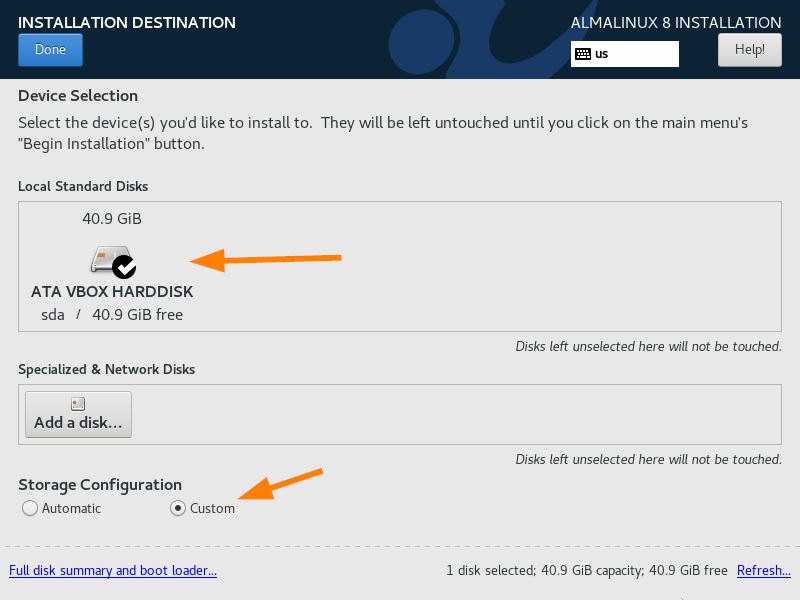
For partitioning scheme, we have two options ‘Automatic’ and ‘custom’
If you are new to Linux, then You can opt to leave the partitioning to ‘Automatic’. With this option, the installer automatically and intelligently partitions your hard drive and saves you the agony of manual partitioning.
In case you want to create customize partition scheme then choose ‘custom’ method. In this article, I will create custom partition partition by choosing the ‘custom’ option.
Once you are done, click on the ‘Done’ button in the far-left corner.
As I have 40GB hard drive, so will be creating following LVM based partitions
- /boot – 2 GB (ext4)
- /home – 10 GB (xfs)
- / – 25 GB (xfs)
- Swap – 2GB
So, let’s create our first partition as /boot. Choose LVM and then click on plus symbol and then specify the mount point as /boot and size as 2 GB.
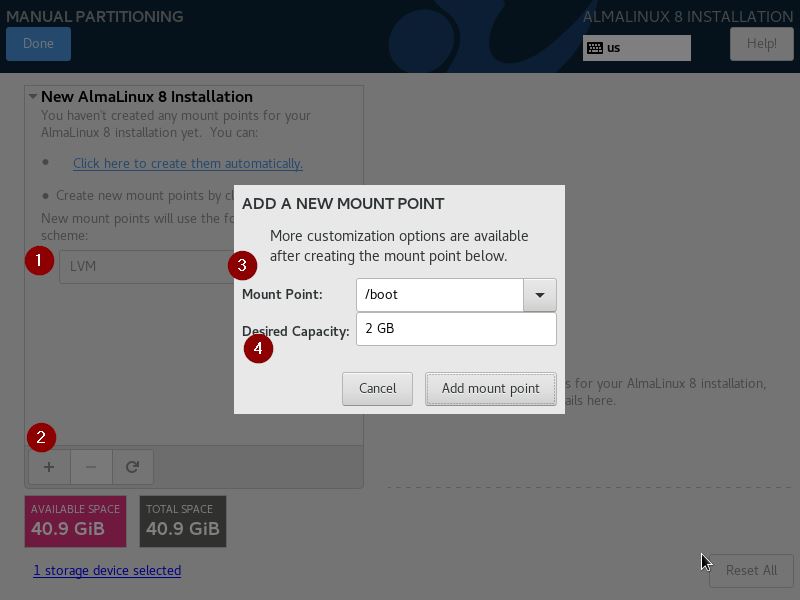
Click on ‘Add mount point’
In the next screen change the file system from xfs to ext4 and then click on ‘Update Settings’.
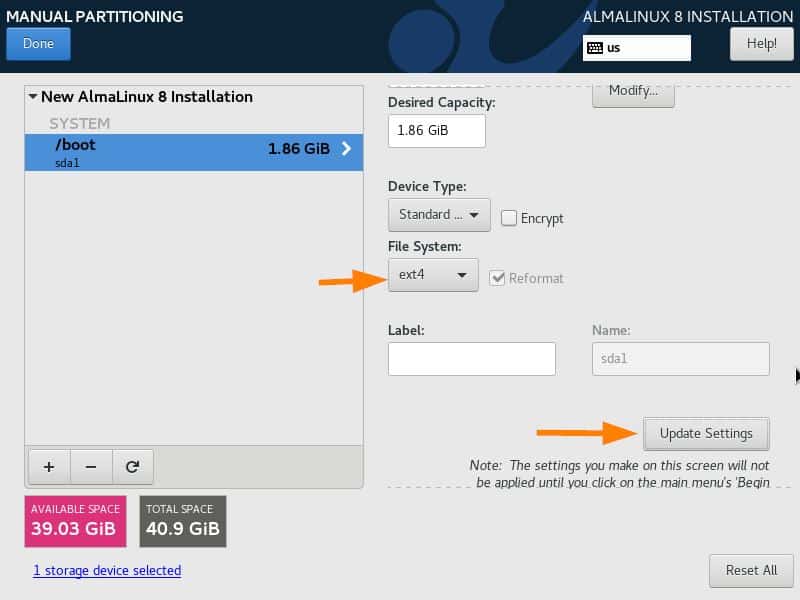
Create next partition as /home of size of 10 GB
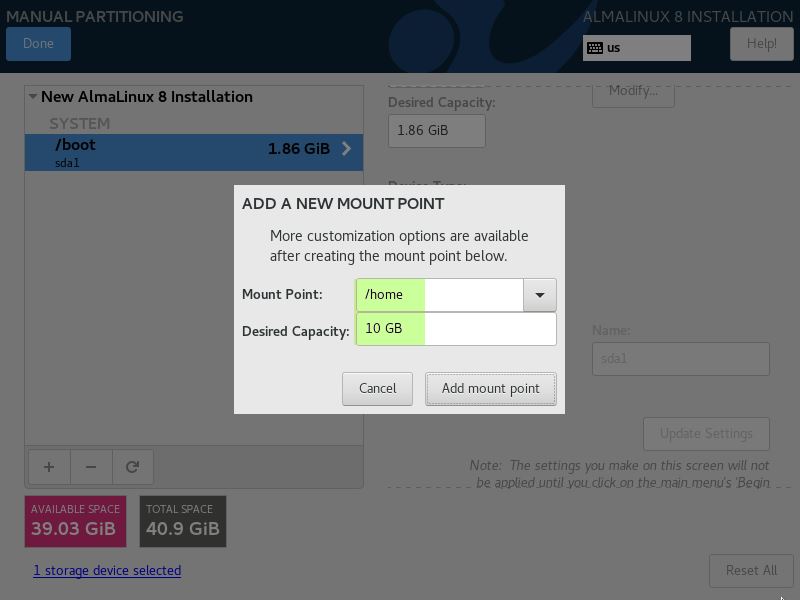
Click on ‘Add mount point’
Similarly, create remaining two partitions as / and swap of size 25 GB and 2 GB respectively.
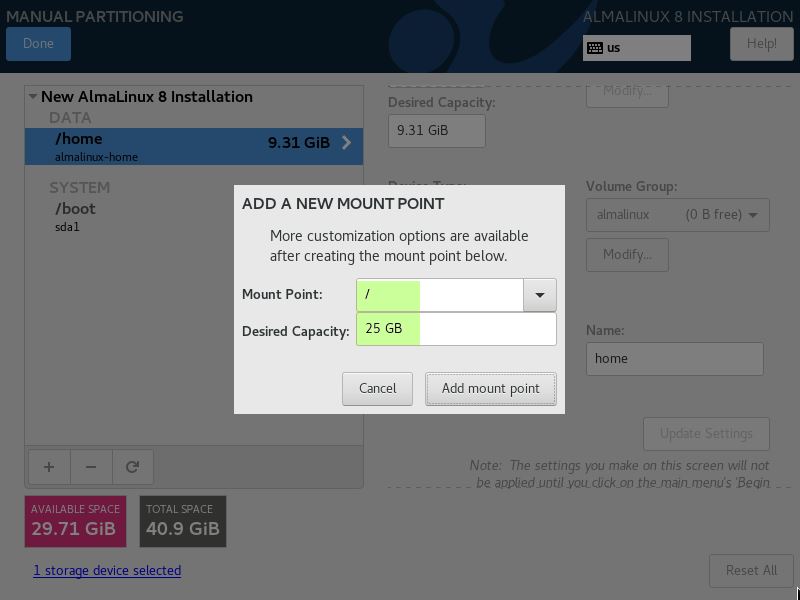
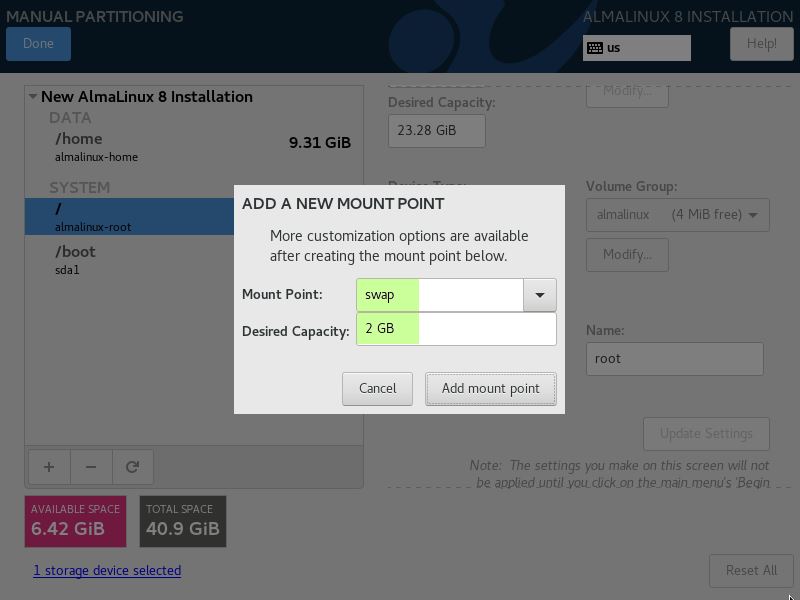
Once we are done with partition creation, then click ‘Done’ option as shown below,
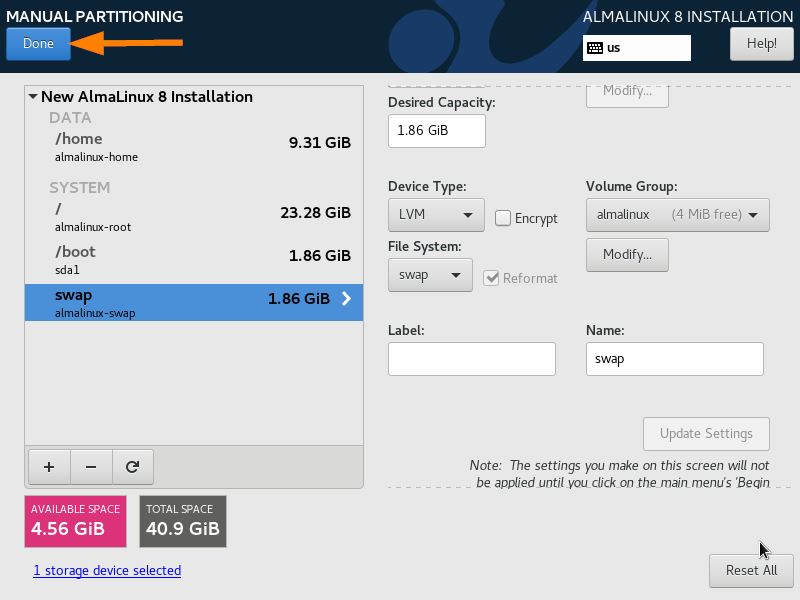
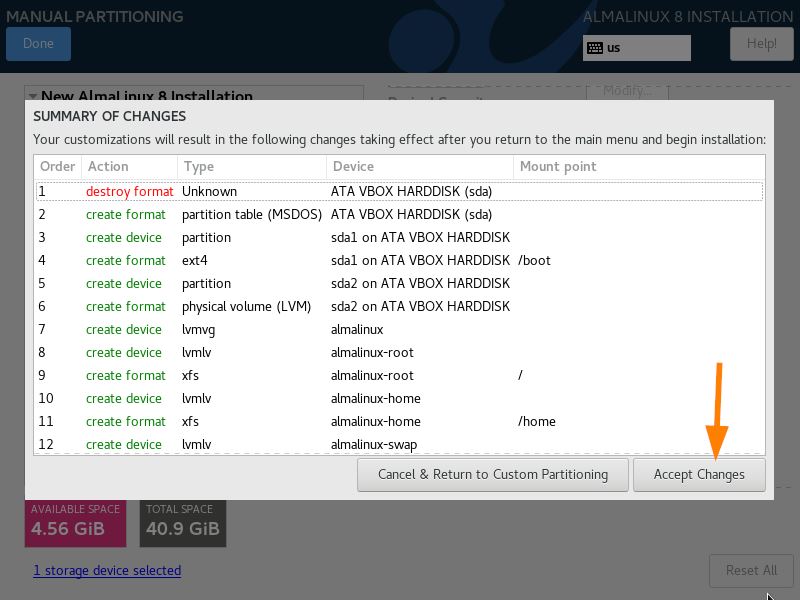
In the next screen, choose ‘Accept Changes’ to write changes into the disk.
Step 5) Configure Network and Hostname
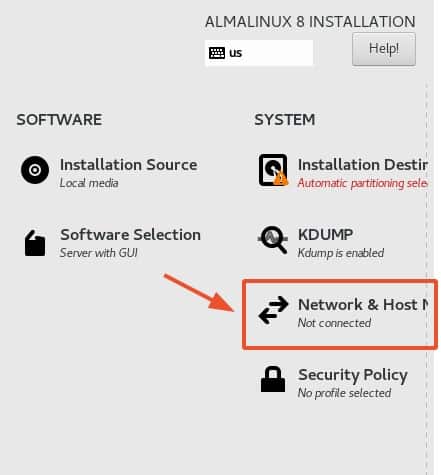
By default, the networking capability is turned off. We need to enable networking for our system to get connected to the internet which will be required for the installation of packages and setting up accurate Time and Date.
So, click on the ‘Network and Hostname’ section.
On the ‘Network & Hostname’ window, turn on the Ethernet connection that corresponds to your network interface as shown.
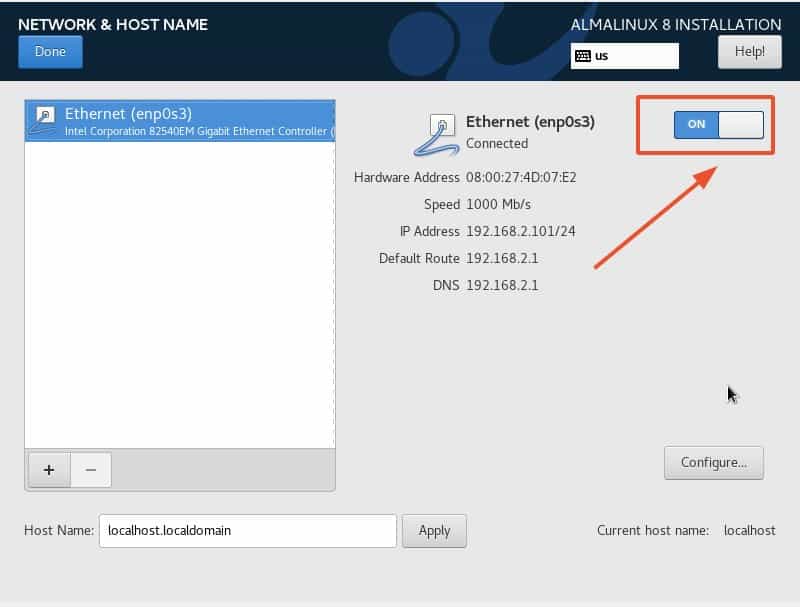
In the bottom section, you can also set your preferred hostname. By default, this is set to localhost.localdomain. Feel free to specify your preferred hostname and click on the ‘Apply’ button.

Finally, click on the ‘Done’ button at the top right corner to save the changes.
Step 6) Configure User settings
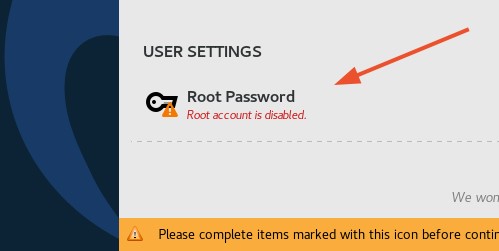
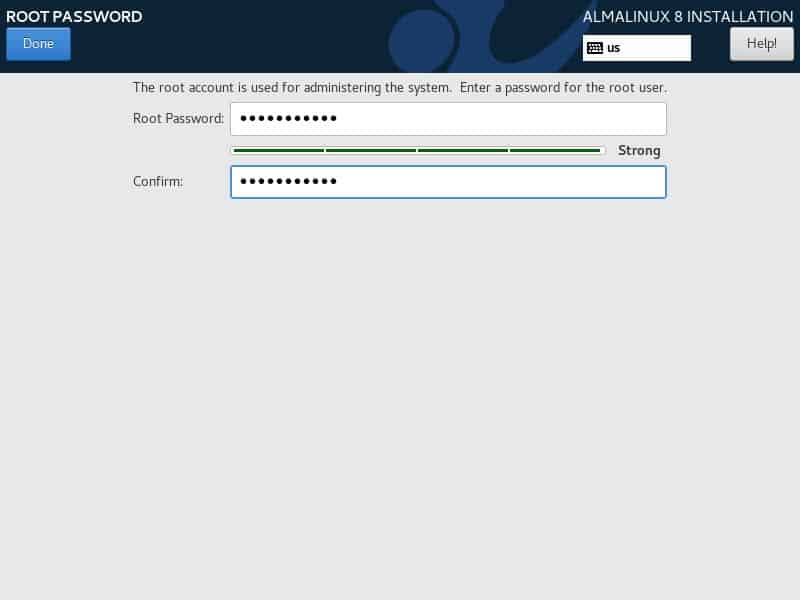
Next, we need to set a root user and password for the root user. The root user has absolute privileges in the system and can make any changes needed. Therefore, under ‘USER SETTINGS’, click on the ‘Root Password’ section as shown.
To create the root user, be sure to provide the root password and confirm it as shown. For security purposes, provide a strong password with a combination of uppercase, lowercase, numeric and special characters.
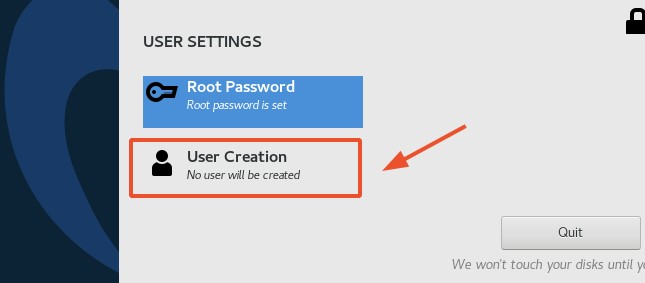
Thereafter, you will be required to create a regular user that you will use to log in for the first time. So, click on the ‘User creation’ option as shown below.
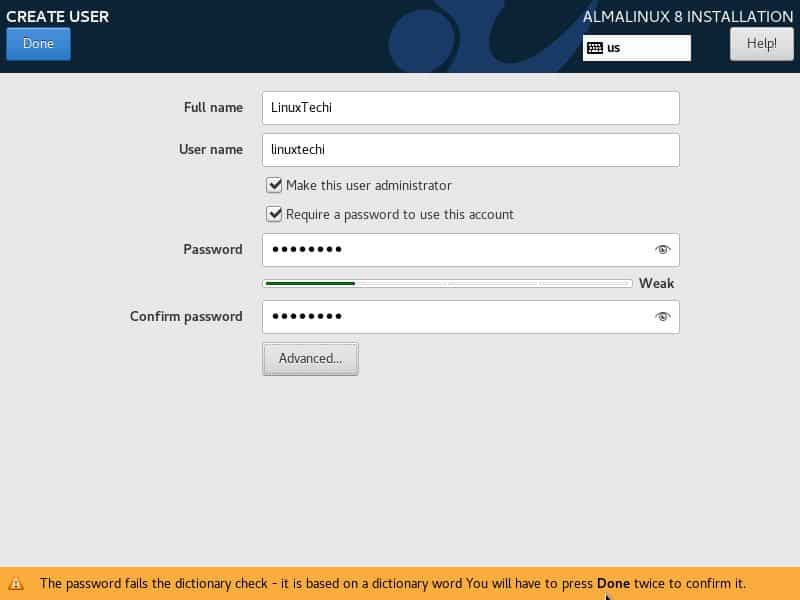
Provide the full name and the username of the user. Then provide the password and confirm it as shown.
Step 7) Configure Software Selection
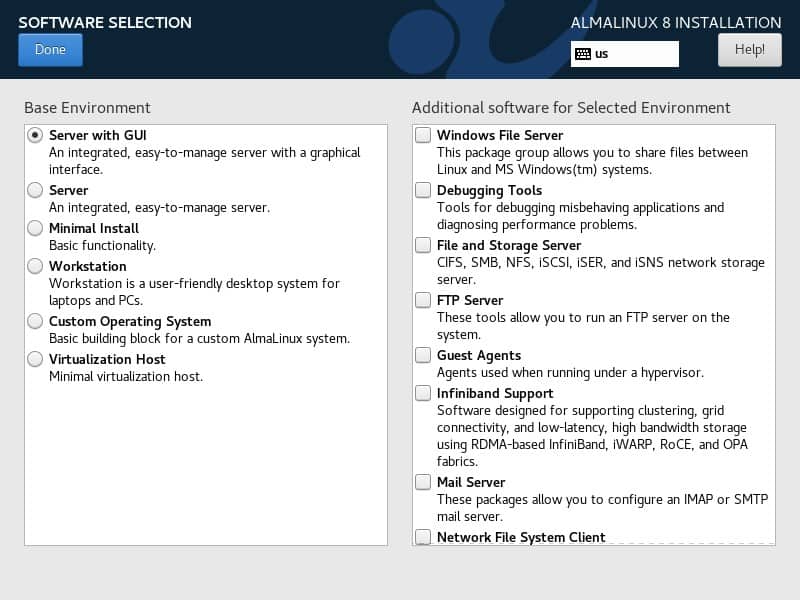
By default, the Base environment is set to ‘Server with GUI’. If you need to change this and select other options, click on the ‘Software Selection’ as shown.
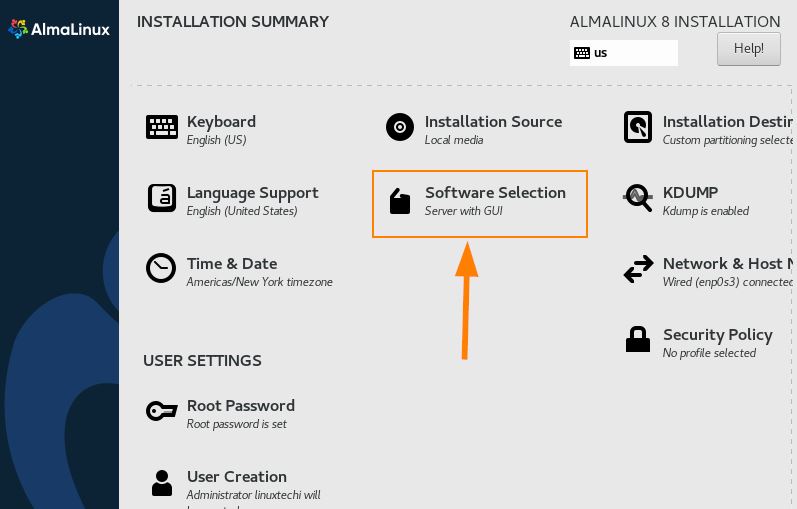
Feel free to select your preferred base environment or pick any additional software for your selection and click on the ‘Done’ button to return to the summary Window.
Step 8 ) Begin the installation
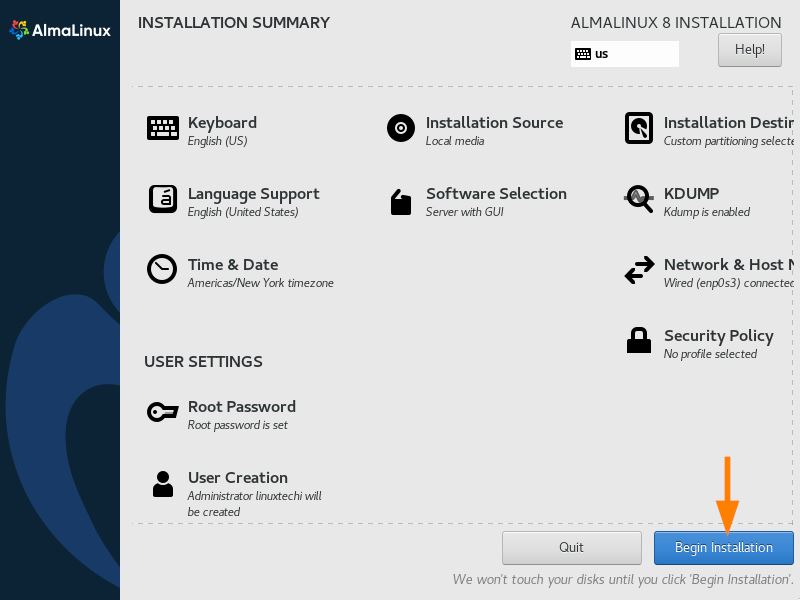
With all the main settings configured, click on the ‘Begin Installation’ at the bottom right corner to begin the installation.
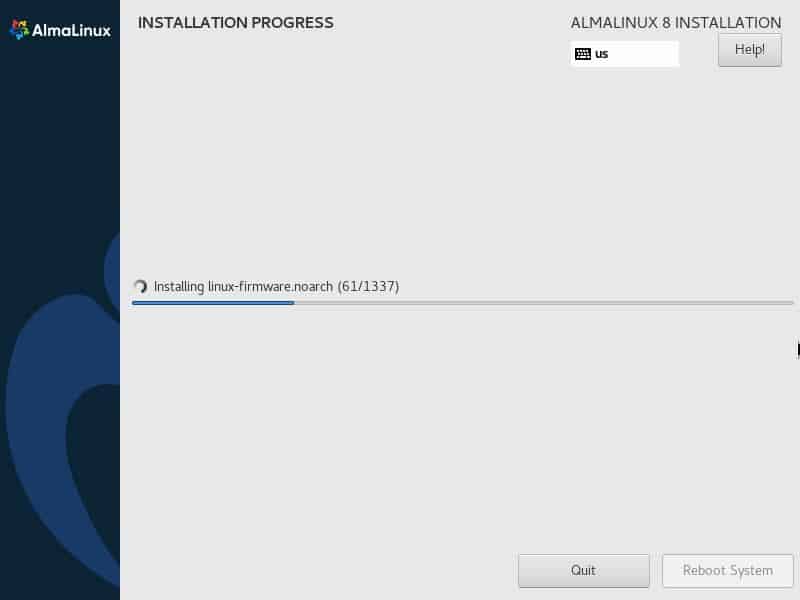
This takes a while as the system installs and configures all the necessary software packages, libraries, and boot files. It’s therefore an ideal moment to take a break and rush to the grocery store or grab a cup of hot chocolate 
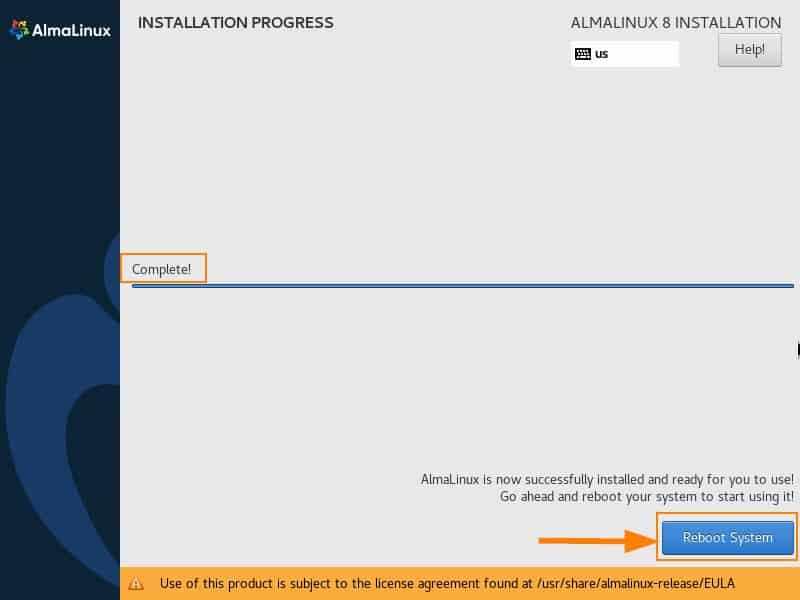
Once the installation is done, you will see the word ‘Complete!’ on the progress bar. At this point, AlmaLinux is installed on your system. You can now hit the ‘Reboot’ button & eject your bootable USB medium.
Step 9) Accept the License agreement
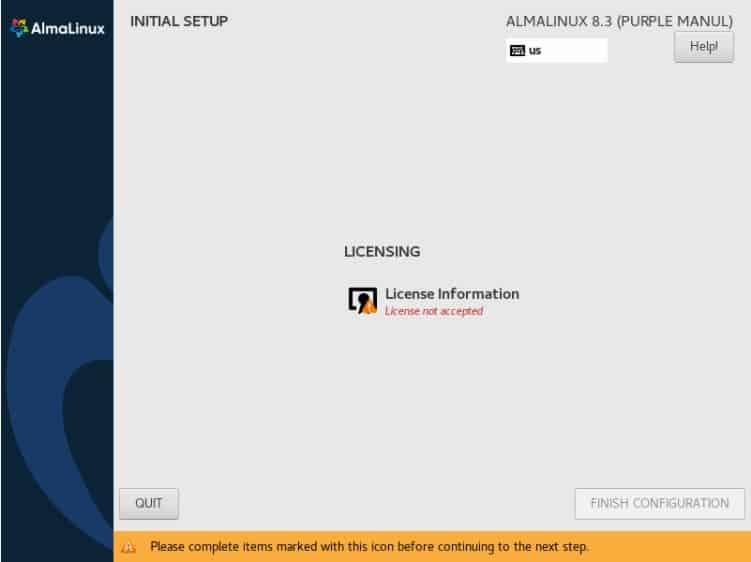
Once the system has rebooted, click on the ‘License Information’ section as shown.
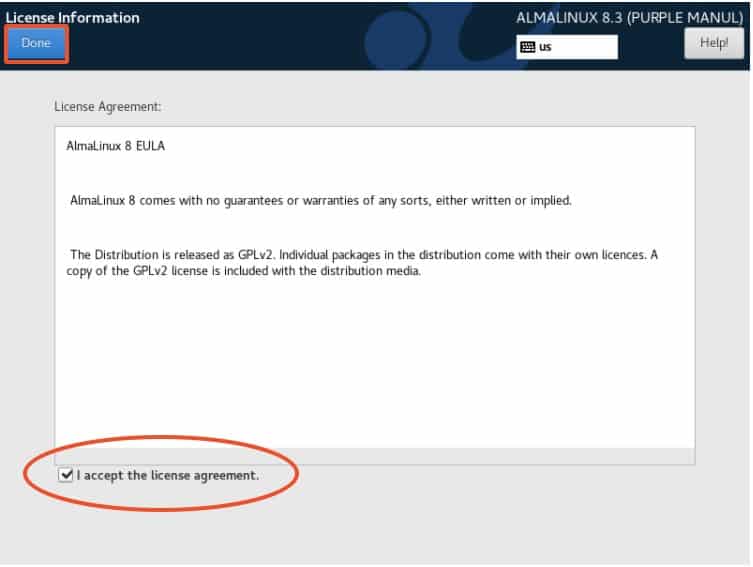
Accept the license agreement by ticking the checkbox circled below and click on ‘Done’ to go back.
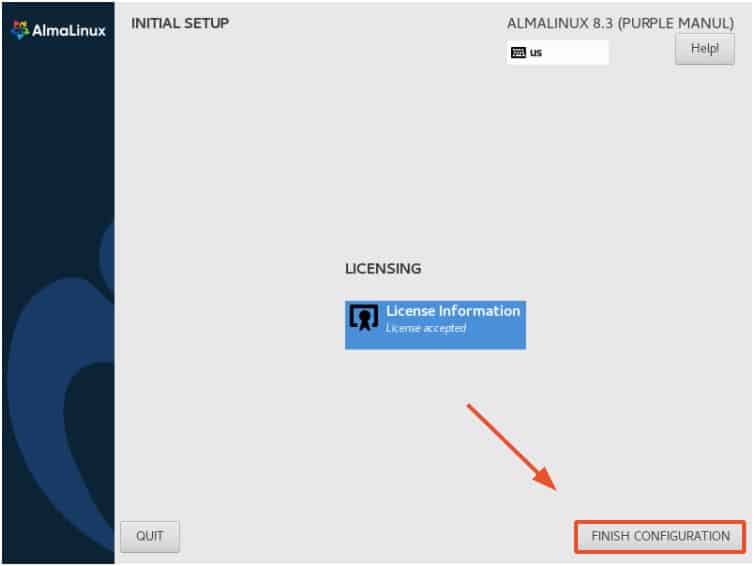
And finally, click on ‘FINISH CONFIGURATION’ to finalize the installation.
Step 10) Log in to AlmaLinux
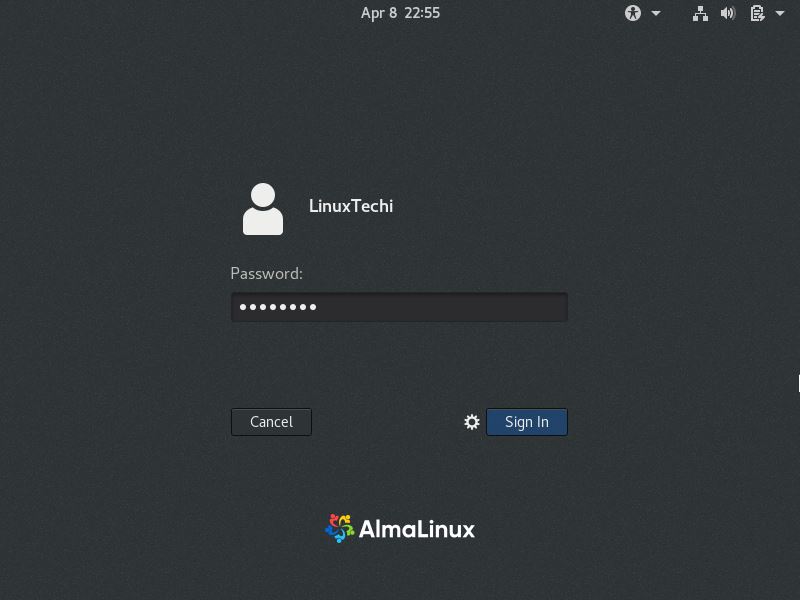
The AlmaLinux login page will come into view, requiring you to log in. Simply provide your password and click on the ‘Sign In’ button.
Thereafter, you will be ushered to the stunning AlmaLinux desktop as shown.
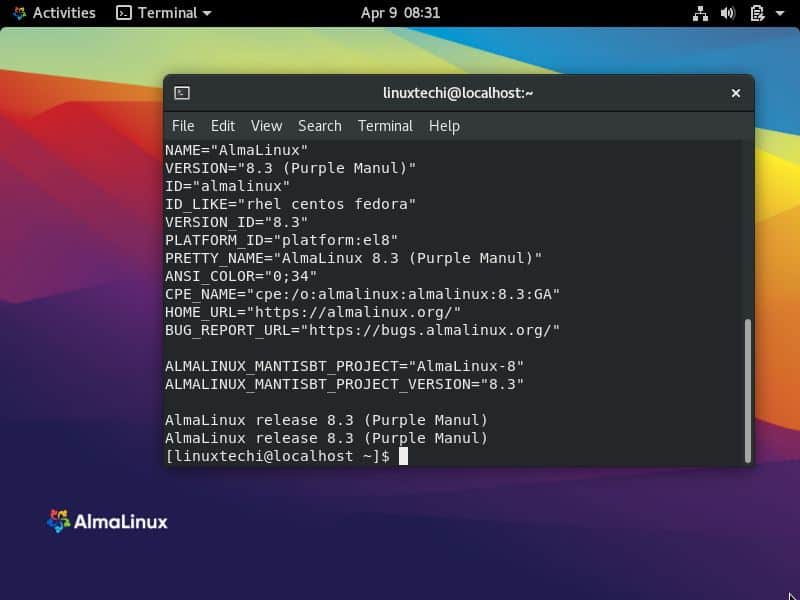
Congratulations! You have successfully installed AlmaLinux. You can now update the system packages and perform other post-installation tasks as you deem fit.
The post How to Install AlmaLinux 8 Step by Step first appeared on LinuxTechi.
