How to Use Subtitles with VLC
I’m a huge fan of anime and if you want to watch the latest episodes, then you have to watch in Japanese audio only making subtitles essential for non-japanese audiences.
Thankfully, my favorite video player VLC supports subtitles pretty well. No wonder it is one of the best video players of all time.
VLC can actually do a lot more than just playing the provided subtitles.
In this guide, I will walk you through the following:
- How to use available subtitles (if there are any)
- How to use downloaded subtitles
- How to download subtitles automatically (using the vlsub extension)
- How to synchronize subtitles with video
- What are the supported subtitle formats with VLC
So let’s start with the first one.
How to enable subtitles in VLC
Some videos come with companion subtitle files. If the subtitles are in the same folder as the video file, you can enable subtitles easily.
While there are several ways to enable subtitles, I will show you two effective ways to do so.
By pressing V (easiest way)
If you have one or more subtitles for the currently playing video, then you can press the V button and it will change the subtitles between the available options:
0:00
And as you can see when I pressed the V, it roamed through multiple subtitles and even had the option to disable the subtitles completely.
Using top menubar or right click context menu
While pressing the V key is the easiest way to enable subtitles but it won’t work best if you have multiple subtitle files (perhaps in multiple languages) and you have to select one of them.
Suppose that the subtitle which you’re looking for is in the last position then you have to press the V key several times and if you missed it, repeat the process again.
So in that case, choosing a subtitle track from the top menu is an easy and convenient way.
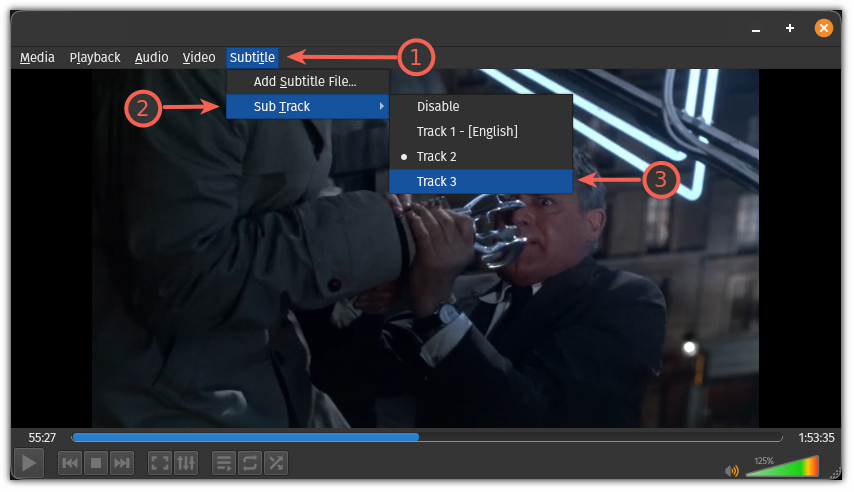
To use this method, you have to follow two simple steps:
- Click on
Subtitlemenu, located in the top menu bar - Choose
Sub Trackand then, select the preferred subtitle track
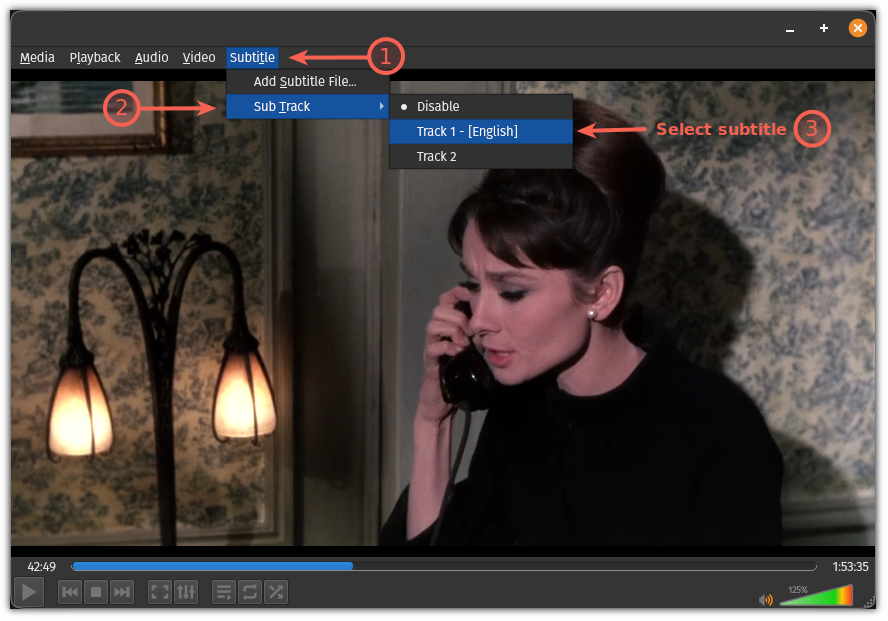
You can also do it by pressing the right-click on the playing video and choosing the subtitles option.
How to use downloaded subtitles in VLC
If you have downloaded subtitles from the web and have no idea how you can use them in VLC, then this section will solve the problem.
To use the downloaded subtitle, you’ll have to import it to VLC. And can easily be done by following the given simple steps:
- First, click on the
Subtitlefrom the top menubar - Choose the first
Add Subtitle Fileoption and it will open the file manager - From here, navigate to where the subtitle file is located and select it
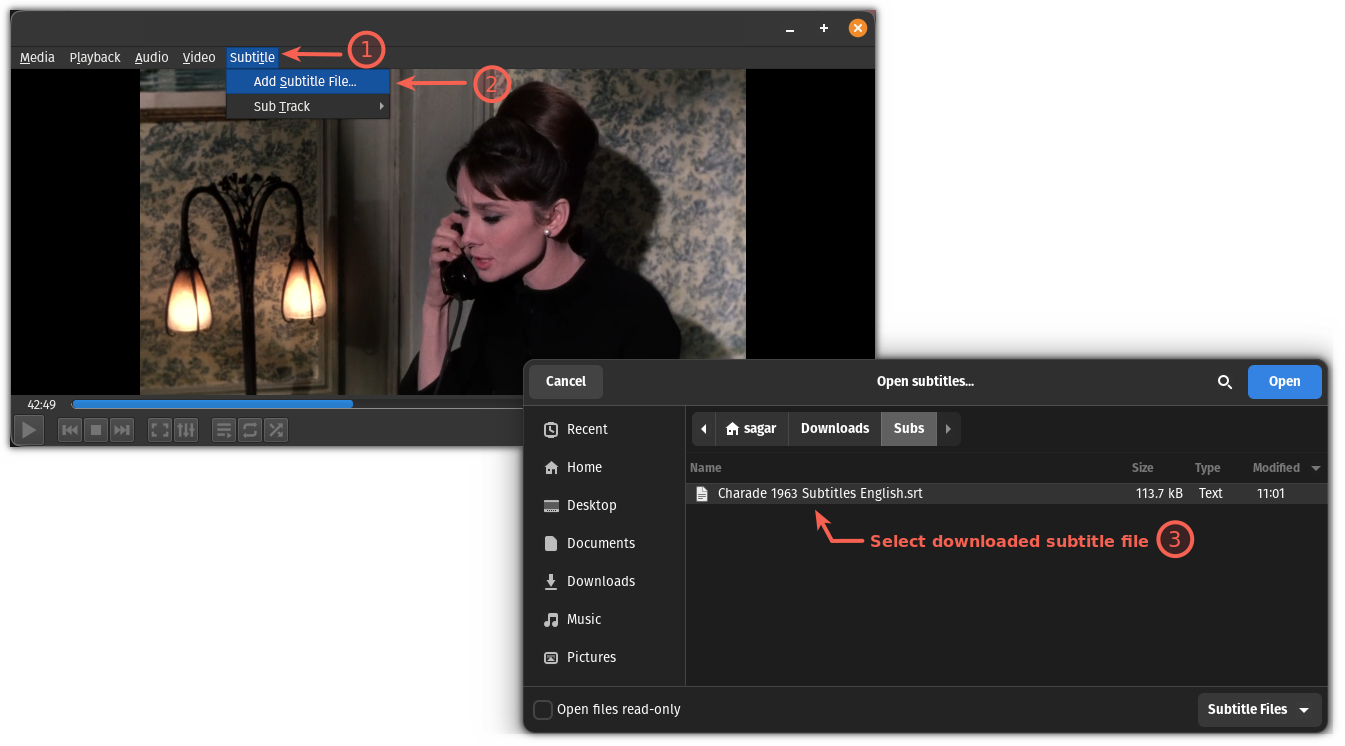
Once done, added subtitles can be accessed through the Subtitle menu located in the top menubar:
How to download subtitles automatically in VLC (for Linux users)
Did you know that VLC has a plugin called VLsub that can be used to download subtitles from the web and accessed them directly in VLC?
And if you’re a Linux user, then follow the given instructions to add it in VLC.
First, download the zip file using the wget command:
wget https://github.com/exebetche/vlsub/archive/master.zipNext, unzip the file using the unzip command as shown:
unzip master.zipAfter that, you’d need to create a new directory:
mkdir -p ~/.local/share/vlc/lua/extensionsAnd finally, move files to the created directory using the mv command as shown:
mv ~/vlsub-master/vlsub.lua ~/.local/share/vlc/lua/extensionsNow, open the VLC player, and under the View menu, you’ll find VLsub:
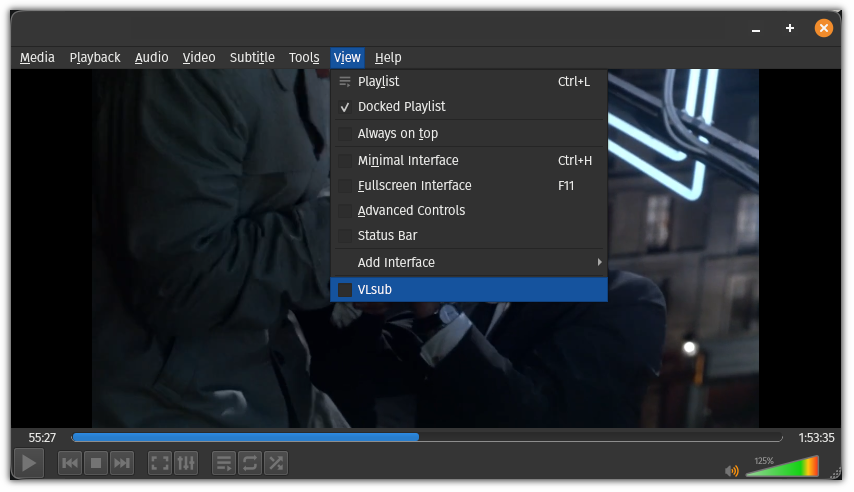
To download subtitles using VLsub, first, enter the name of the movie with the year to have better results, and hit Search by name button, select the subtitle file from the results, and click on the Download selection button as shown:
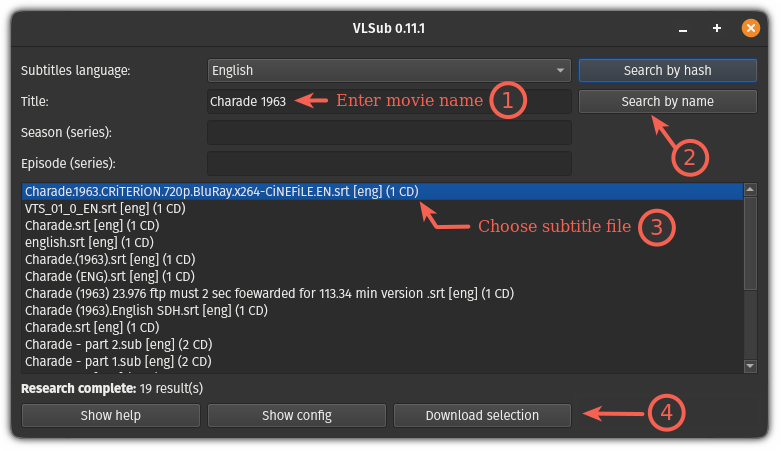
That’s it!
To learn more about how to use the VLsub extension, refer to our detailed guide on that topic:
How to synchronize subtitles with the movie in VLC
Sometimes the downloaded subtitles may be a little behind or forward to what’s going on in the movie which can be frustrating!
Worry not! VLC has a solution for this problem too!
In VLC, you can forward or backward subtitles by pressing G and H keys.
- The
Gkey will forward the subtitle by 50 milliseconds - The
Hkey will backward the subtitle by 50 milliseconds
While 50 milliseconds sounds too less, you will notice a significant difference within 2-3 keystrokes.
You can also press and hold them if you’re running too ahead or behind the actual scenes.
Still confused? You may refer to our detailed guide on how to synchronize subtitles in VLC:
What are the supported subtitle formats in VLC?
If you wish to download subtitles from the internet, then, you must know the supported subtitle formats by VLC.
Here is the list of the supported subtitle formats by VLC:
- *.idx (VOBSub)
- *.cvd (Chaoji VCD)
- *.usf (Universal Subtitle)
- *.ttxt (MPEG-4 Timed Text)
- *.srt (SubRip)
- *.ssa (Sub Station Alpha)
- *.smi (SAMI)
- *.aqt (AQTitle)
- *.txt (ML2/VPlayer)
- *.rt (RealText/Smil)
- *.psb (PowerDivX)
- *.pjs (Phoenix Subtitle)
- *.dks (DKS)
- *.mpl (ML2)
- *.jss (JACOSub)
- *.svcd (Super Video CD)
- *.txt (ML2/VPlayer)
But the most popular subtle type is *.srt and often shipped by default when you download video files.
VLC can do a lot more than playing videos
Did you know that you can download YouTube videos using VLC? Well, it can do a lot more than just that.
And for that purpose, we made a detailed guide on cool things you can do with VLC player:

And here’s how you can get more out of VLC:

I hope you will find this guide helpful.

