NixOS Series #5: How to set up home-manager on NixOS?
Before publishing this, I explained how to install and remove packages in NixOS for a single-user system.
But if you are running multiple users, there is an excellent way to cater needs of every user separately.
And in this guide, I will walk you through how you can set up a home manager on NixOS and how it can be used to install packages.
If you are new here, some resources discussed in this series include:
- Reasons to use nixOS
- Installing NixOS on a virtual machine
- Things to do after installing NixOS
Setup home-manager on NixOS
In this guide, I will walk you through 2 ways to set up a home manager:
- Standalone home manager (uses separate config file)
- As a nix module (using it inside
configuration.nixfile)
So let’s start with the standalone option.
Standalone installation of home-manager
If you are using a stable channel of NixOS, you can use the following command to configure the home manager:
nix-channel --add https://github.com/nix-community/home-manager/archive/release-22.11.tar.gz home-managerWhile writing this guide, the stable release is 22.11.
And if you are on an unstable channel, use the following:
nix-channel --add https://github.com/nix-community/home-manager/archive/master.tar.gz home-managerThe following steps will remain the same whether you use stable or unstable.
Once done, update the channels:
nix-channel --updateAnd finally, use the following command to install the home manager:
nix-shell '<home-manager>' -A install🛠️ While installing, it may throw the following error:

Reboot your system and use the installation command again, and it will start the installation.
Once done, it will show the location of the standalone installation of the home manager:

Installing home-manager as a NixOS module
If you are on a stable channel (while writing, it is 22.11), you can use the following command to add the stable channel of the home manager:
sudo nix-channel --add https://github.com/nix-community/home-manager/archive/release-22.11.tar.gz home-managerAnd if you are using unstable or the master channel, use the following:
sudo nix-channel --add https://github.com/nix-community/home-manager/archive/master.tar.gz home-managerOnce you are done adding a channel by using any of one command shown above, update the channel using the following:
sudo nix-channel --updateNext, open the configuration.nix file using:
sudo nano /etc/nixos/configuration.nixAnd add the following line inside the imports []:
<home-manager/nixos>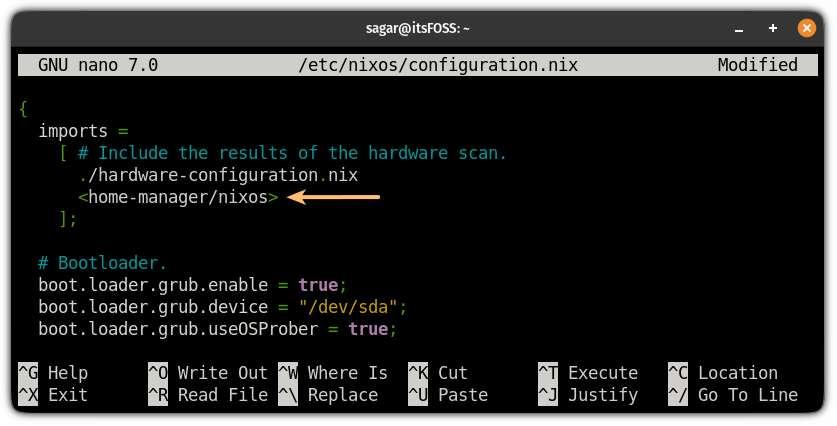
Now, jump to the end of the line and add the following before }:
home-manager.users.{username} = { pkgs, ... }: {
  home.packages = [  ];
  };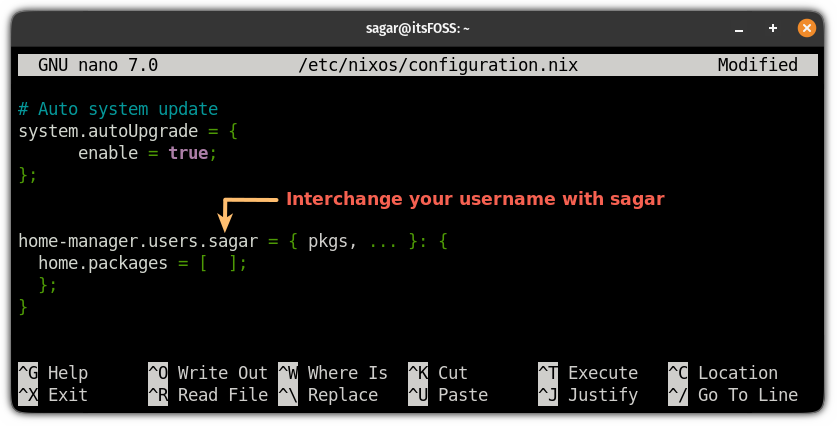
The above line was added to facilitate installing and removing packages I will show you next.
Now, save changes and exit from the nano text editor.
Next, rebuild the config and make a switch:
sudo nixos-rebuild switchBut if you are using stable release and use the above command, it will throw the error saying :
🛠️ error: The option `home-manager.users.user.home.stateVersion’ is used but not defined:

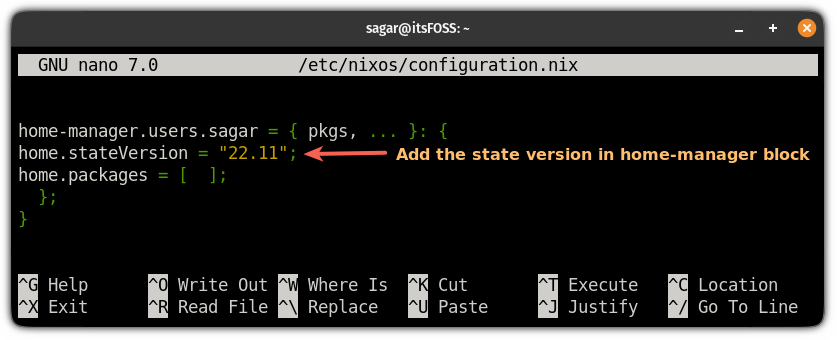
To solve this issue, you will have to add the home.stateVersion in your home manager block.
While writing, I’m running 22.11, so the whole home manager block would look like this:
home-manager.users.{username} = { pkgs, ... }: {
home.stateVersion = "22.11";
home.packages = [ ];
  };
Save changes and exit from the nano text editor by pressing Ctrl + O, hitting enter and Ctrl + X.
Now, try to rebuild the config and make the switch again, and that should solve the issue.
How to install packages using home-manager on NixOS
Now that you have home-manager installed, how to install packages with it:
Using a standalone install of Home-manager
First, open the configuration file by using the following:
nano /home/$USER/.config/nixpkgs/home.nixJump to the end of the line and add the following code block before }:
home.packages = [];Now, all you have to do is write the package’s name between those two braces.
For example, if I want to install htop, I will have to enter the following:
home.packages = [pkgs.htop];Yes, you will have to usually append the name of the package with pkgs.
But if you want to get away with using pkgs. using every time you install a new package, change the syntax of the code block as shown:
home.packages = with pkgs; [];And now, you are no longer required to use pkgs. for every installation:
home.packages = with pkgs; [htop];For example, here, I wanted to install htop, firefox, and LibreOffice so my home block would look like this:
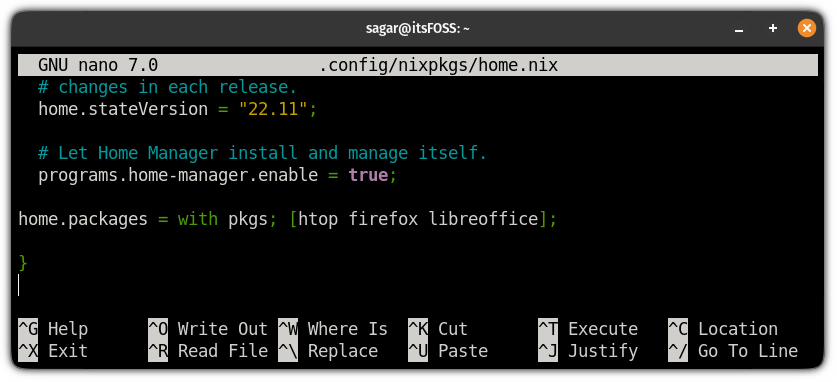
Once you are done adding your favorite packages, save the config file and use the following command to install packages:
home-manager switchUsing the NixOS module
First, open the configuration.nix file using the following command:
sudo nano /etc/nixos/configuration.nixIn the configuration part, I’ve already added the home manager block, so all it is left is to add the name of the package inside home.packages = [ ]; in the shown format:
home.packages = [ pkgs.package_name ];pkgs. before the package name in the above section (installing packages on the standalone home manager).For example, if I want to install htop, Firefox, and LibreOffice, then I will add:
pkgs.htop pkgs.firefox pkgs.libreofficeAnd my home manager block would look like this:
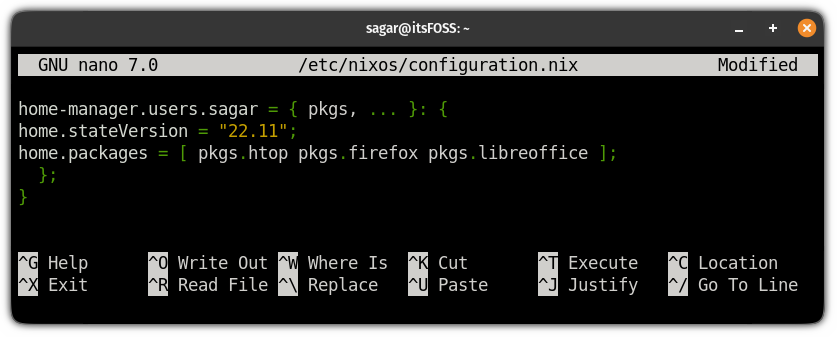
Now, save changes and exit from the text editor.
Next, rebuild the config and make a switch using the following command:
sudo nixos-rebuild switchThat’s it! The packages will be installed in no time.
‘Tis the end
I think you should go with the standalone installation, as you are not required to use the superuser privileges. Also, having separate config files for separate users is quite convenient if you run a system with multiple users.
So unless you want one file for every purpose, I see no other reason to use the module option.
With this, I conclude the NixOS beginner series. I hope it gets you a good enough platform to get familiar with this unique Linux distribution.
💬 How did you like the NixOS series? Is there something else we should cover for NixOS beginners? Please provide your valuable feedback.
