How to Delete Partition in Linux Step-by-Step
Sometimes, you might want to delete some disk partitions on your Linux system to recover or regain some storage space. You can easily accomplish this on the command line with a few simple steps.
In this guide, we will demonstrate how you can delete a partition in Linux step-by-step. We will start off by deleting a standard partition and then deleting an LVM partition.
Delete a standard partition using the fdisk utility
The fdisk tool, also known as format disk, is a Linux utility that ships by default with every modern Linux distribution. The tool provides disk partitioning functions such as creating and deleting disk partitions, modifying the partition table, and printing the disk partitions to mention just a few.
Before deleting a partition, it is always advised to back up any data on it.
In our setup, we have a USB drive attached to the system with two partitions: /dev/sdc1 and /dev/sdc2. To confirm the existence of the partitions, we will run the fdisk utility as follows.
$ sudo fdisk -l /dev/sdc

You can also run the command to list the partitions on the block volume as shown.
$ lsblk | grep sdc

We are going to delete the second partition /dev/sdc2 using the fdisk utility.
To get started, invoke the fdisk command-line tool.
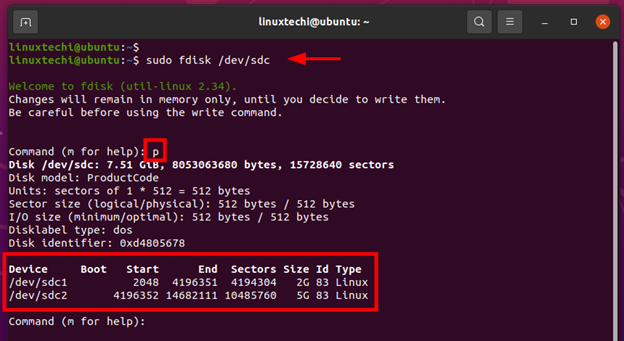
$ sudo fdisk /dev/sdc
This launches an interactive command-line prompt. Type ‘p’ to print the current partition table of the drive. The output below confirms the existence of the two partitions.

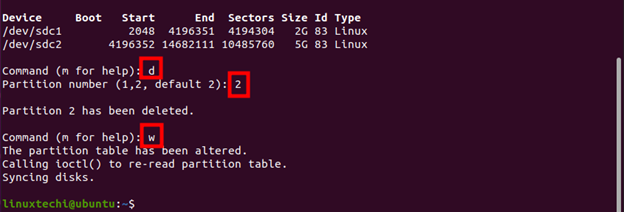
Since our mission is to delete the second partition, we will type ‘d’ for delete and press ENTER. Next, specify the partition number of the drive to be deleted – in this case, partition number 2 which corresponds to /dev/sdc2.
You will get the message: Partition 2 has been deleted.
To save the changes made to the partition table, type ‘w’ to write changes and press ENTER.

To verify that the volume has been deleted, once again, run the fdisk utility as follows.
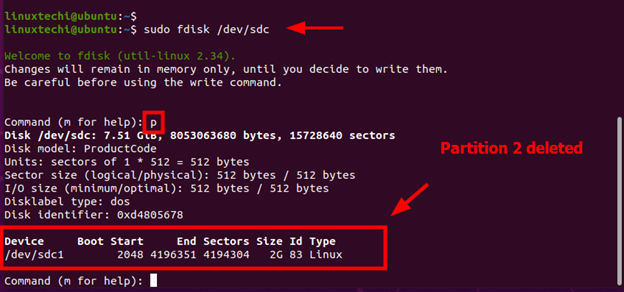
$ sudo fdisk /dev/sdc
When prompted for the command, type ‘p’ for print to view the partition table. This time around, only one partition is listed – /dev/sdc1. This confirms that we have successfully deleted the second partition.

How to delete an LVM partition
LVM (Logical Volume Management ) is a storage concept that combines multiple disk partitions or hard drives into a single volume group (VG). The volume group can, hence, be used as a single large volume or sub-divided into other logical volumes (LV)
In this setup, we have a volume group called vg01 mounted on a mount point called /data.
$ df -Th | grep -i /data

You can also run the lvs command to list the Logical Volume and Volume Groups.
$ sudo lvs

We are going to delete lv01 Logical Volume from the vg01 Volume Group.
To do so, first, delete the Logical Volume entry from the /etc/fstab file.
$ cat /etc/fstab
...
/dev/mapper/vg01-lv01    /data    ext4    defaults     0 0
...
Save the changes and exit the file. Next, unmount the directory on which the Logical Volume is mounted.
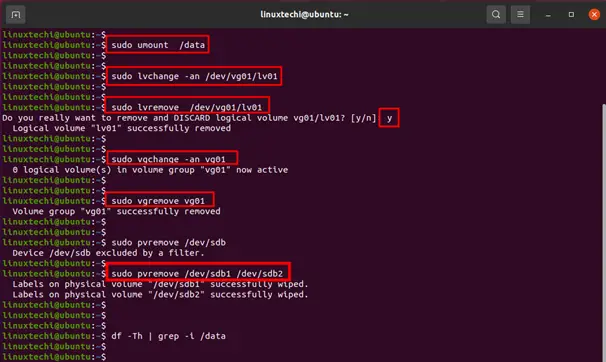
$ sudo umount /data
Next, disable the Logical Volume Group.
$ sudo lvchange -an /dev/vg01/lv01
Be sure to delete the LVM volume. When prompted, type ‘y’ to proceed
$ sudo lvremove /dev/vg01/lv01
Next, disable the Volume Group.
$ sudo vgchange -an vg01
Thereafter, delete the Volume Group.
$ sudo vgremove vg01
Finally, delete the physical volumes that were used to create the Volume Group called vg01. In this case, these were /dev/sdb1 and /dev/sdb2.
$ sudo pvremove /dev/sdb1 /dev/sdb2

When you run the lvs command again, you won’t get any output. This is a confirmation that the LVM volume has successfully been deleted.
$ sudo lvs

Conclusion
And it’s a wrap. We have successfully demonstrated how you can delete a standard and an LVM partition in Linux. We hope you were able to follow along and implement the steps to delete disk partitions on your system.
Also Read: How to Create LVM Partition Step-by-Step in Linux
The post How to Delete Partition in Linux Step-by-Step first appeared on .
