
How to Install Apache Tomcat 10 on Debian 10 (Buster)
Apache Tomcat is free and open-source Java based HTTP Web server which offers the environment where Java code can run. In short Apache Tomcat is known as Tomcat. Recently Tomcat 10 has been released, so in this article, we will demonstrate on how to install and configure Apache Tomcat 10 on Debian 10 system.
Prerequisites
- Debian 10 Installed System
- Sudo privilege user
- Stable Internet connection
Let’s dive into the installation steps of Apache Tomcat 10
Step 1) Install Java (JRE 8 or higher)
As Tomcat is Java based http web server, so we must install java on our system before start installing tomcat. Tomcat 10 needs at least JRE 8 or higher version. So, to install java run following commands,
$ sudo apt update
$ sudo apt install -y default-jdk
Once Java is installed, verify its version by executing below:
$ java --version

Step 2) Add Tomcat User
It is recommended to have tomcat user for tomcat services. So, create following tomcat user with home directory as ‘/opt/tomcat’ and shell as ‘/bin/false’
Run the following useradd command,
$ sudo useradd -m -U -d /opt/tomcat -s /bin/false tomcat
Step 3) Download and Install Tomcat 10
Tomcat 10 packages are not available in Debian 10 package repositories, so we will download its compressed tar file from its official portal via below wget command,
$ wget
https://downloads.apache.org/tomcat/tomcat-10/v10.0.4/bin/
apache-tomcat-10.0.4.tar.gz
Extract the downloaded compress tar file using beneath tar command
$ sudo tar xpvf apache-tomcat-10.0.4.tar.gz -C /opt/tomcat --strip-components=1
Once the tar file is extracted, set the correct permissions on files and directories by running following commands,
$ sudo chown tomcat:tomcat /opt/tomcat/ -R
$ sudo chmod u+x /opt/tomcat/bin -R
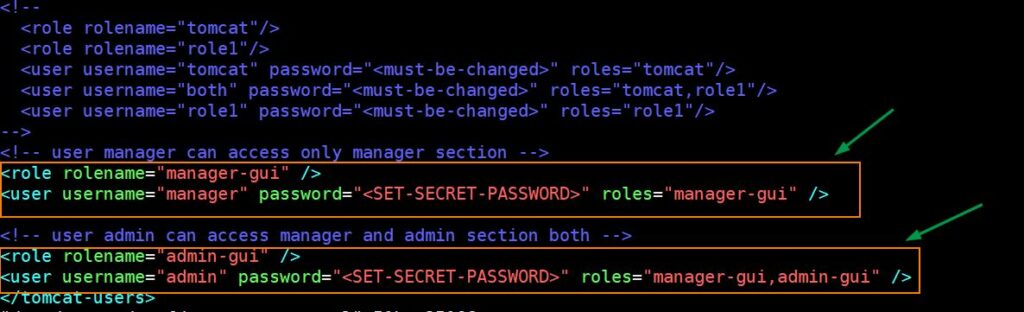
Step 4) Configure Tomcat User via tomcat-users.xml file
To configure Tomcat users, edit the file ‘/opt/tomcat/conf/tomcat-users.xml’ and add following lines just before </tomcat-users> section.
$ vi /opt/tomcat/conf/tomcat-users.xml
………
<role rolename="manager-gui" />
<user username="manager" password="<SET-SECRET-PASSWORD>" roles="manager-gui" />
<role rolename="admin-gui" />
<user username="admin" password="<SET-SECRET-PASSWORD>"
roles="manager-gui,admin-gui"/>
</tomcat-users>
……
Save and close the file.
Note : Don’t forget to set secret password in the above file.
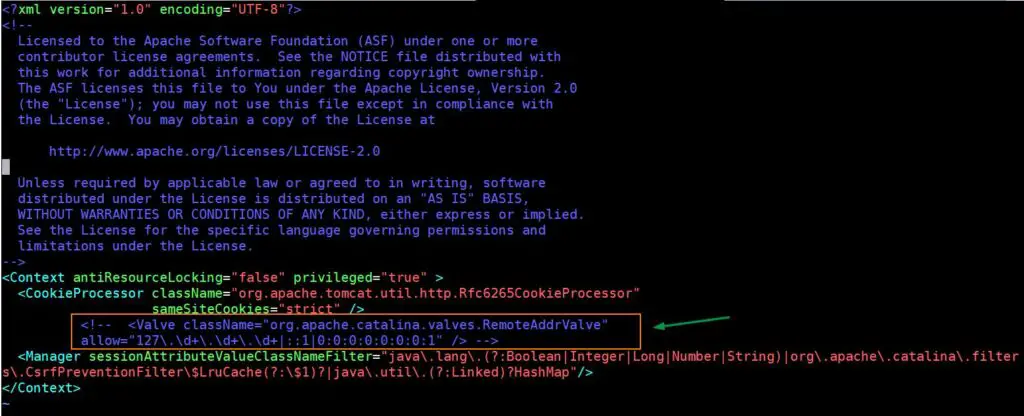
Step 5) Allow Remote Access of Tomcat
By default, Admin GUI and Manager GUI are accessible from localhost, in case you want to access tomcat applications from outside then edit the context.xml file for manager & host-manager and comment out the remote access section. Example is shown below,
$ sudo vi /opt/tomcat/webapps/manager/META-INF/context.xml
……
<!--      <Valve className="org.apache.catalina.valves.RemoteAddrValve"
                 allow="127.d+.d+.d+|::1|0:0:0:0:0:0:0:1" />
  -->
…
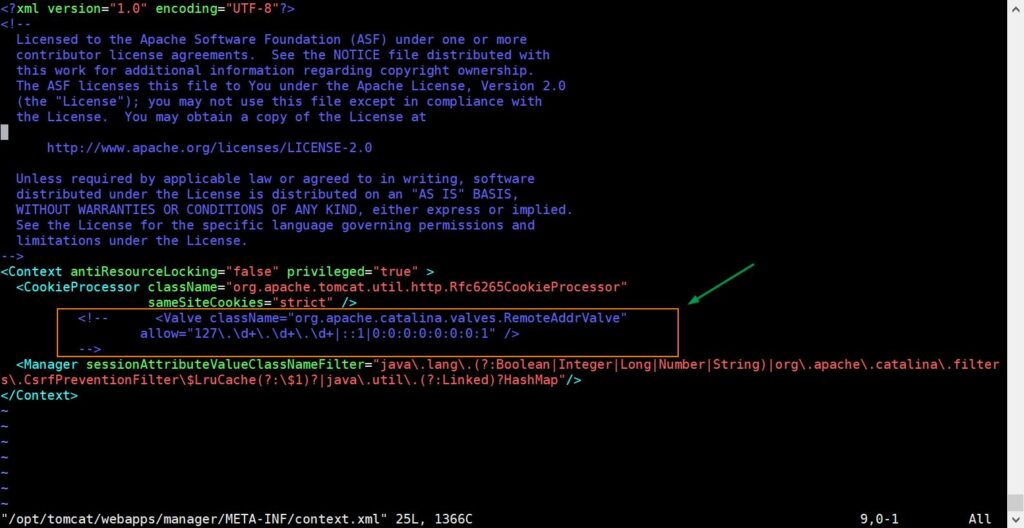
Save and close the file.
$ sudo vi /opt/tomcat/webapps/host-manager/META-INF/context.xml
Save and exit the file.
Step 6) Configure Systemd Unit File for Tomcat
By default, tomcat comes with shell scripts which allows the geeks to start and stop tomcat services. It is recommended to have systemd unit file for tomcat so that during reboots tomcat service comes up automatically. So, to configure systemd unit file, create the beneath file with following contents,
$ sudo vi /etc/systemd/system/tomcat.service
[Unit]
Description="Tomcat Service"
After=network.target

[Service]
Type=forking
User=tomcat
Group=tomcat

Environment="JAVA_HOME=/usr/lib/jvm/java-1.11.0-openjdk-amd64"
Environment="JAVA_OPTS=-Djava.security.egd=file:///dev/urandom"
Environment="CATALINA_BASE=/opt/tomcat"
Environment="CATALINA_HOME=/opt/tomcat"
Environment="CATALINA_PID=/opt/tomcat/temp/tomcat.pid"
Environment="CATALINA_OPTS=-Xms512M -Xmx1024M -server -XX:+UseParallelGC"

ExecStart=/opt/tomcat/bin/startup.sh
ExecStop=/opt/tomcat/bin/shutdown.sh

[Install]
WantedBy=multi-user.target
Save and close the file.
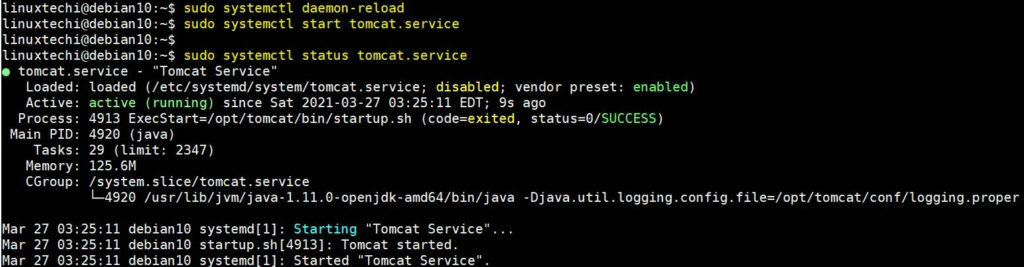
Now reload systemd daemon and start tomcat service by executing following commands,
$ sudo systemctl daemon-reload
$ sudo systemctl start tomcat.service
Run following systemctl command to verify tomcat service status
$ sudo systemctl status tomcat.service
Also don’t forget to enable tomcat service so that it would be persistent across reboot.
$ sudo systemctl enable tomcat
Note: In case firewall is enable and running on your Debian 10 system then allow 8080 tcp port,
$ sudo ufw allow 8080/tcp
Step 7) Access Tomcat Web Interface (GUI)
To Access default web page of Tomcat 10, type following URL in web browser and then hit enter
http://<Server-IP-Address>:8080
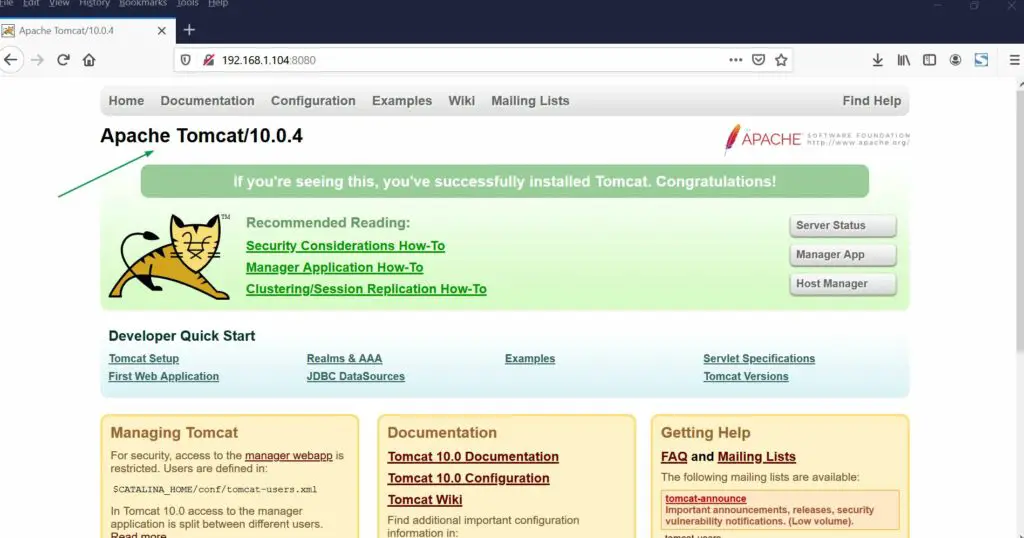
Perfect, above page confirms that Tomcat 10 has been installed successfully.
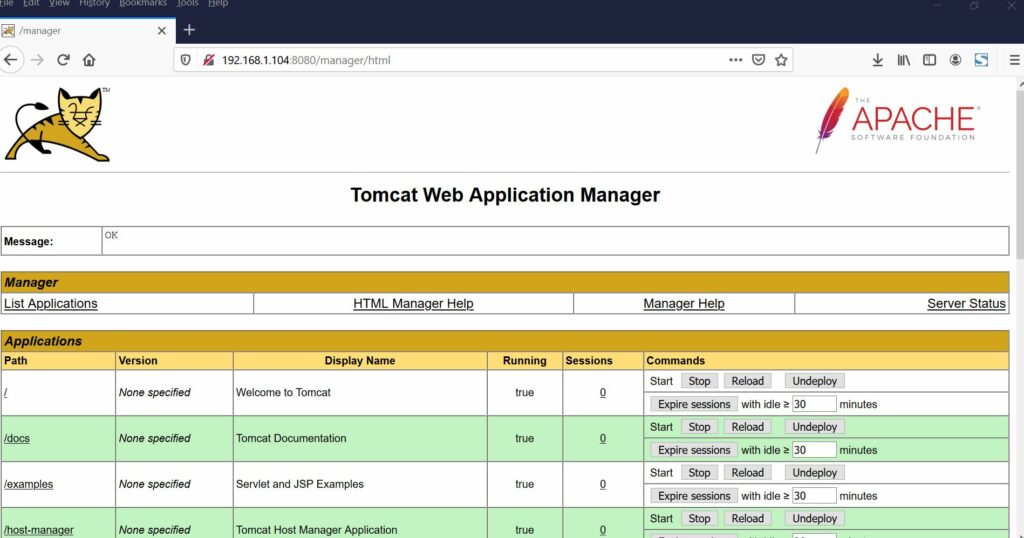
To Access Tomcat Web Manager page type
http://<Server-IP-Address>:8080/manager/
It will prompt for username and password, Use username as ‘admin’ and password that we specify in the file ‘/opt/tomcat/conf/tomcat-users.xml’ for admin-gui role
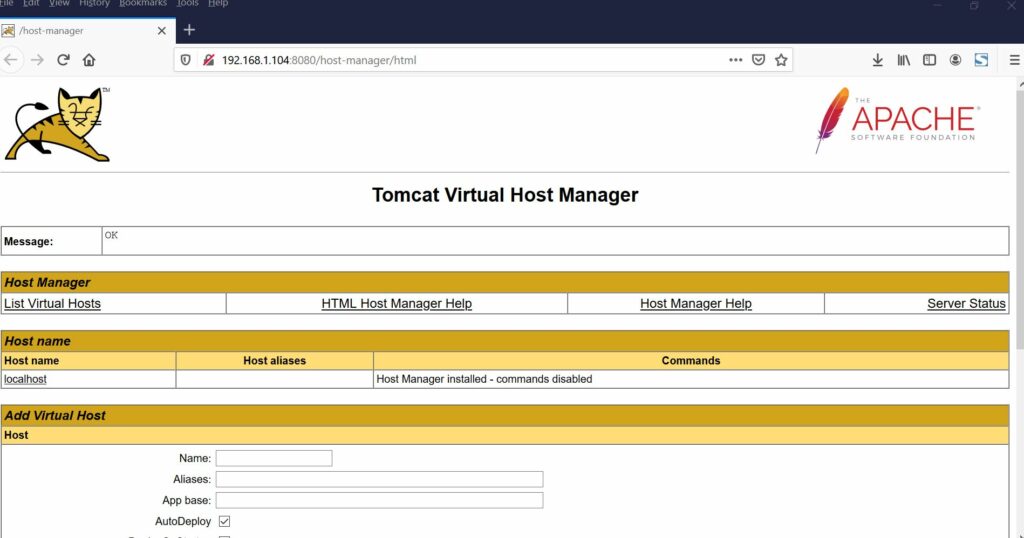
To Access Host Manager Web Page, type
http://<Server-IP-Address>:8080/host-manager/
Use username as admin and password that you specify in the file ‘/opt/tomcat/conf/tomcat-users.xml’
That’s all from this tutorial. I hope you have found it informative and please don’t hesitate to share your feedback and suggestions.
The post How to Install Apache Tomcat 10 on Debian 10 (Buster) first appeared on LinuxTechi.