
How to Install Apache Tomcat on Debian 11 (Step by Step)
Apache Tomcat is a free and opensource web server which is widely used for hosting web applications written in Java programing language. It is an implementation of Jakarta Servlet and Jakarta Expression Language (formerly Java Servlet and Java Expression Language) and other Java websocket technologies.
Apache Tomcat is not exactly a web server in the sense of Apache or Nginx. It’s an application server that provides a pure Java HTTP ecosystem and Java-based logic to serve Java code.
In this guide, we will learn how to install Apache Tomcat on Debian 11 (Bullseye) step by step.
Step 1) Install OpenJDK
Since Tomcat is built on Java, the very first step will be to install Java which will be provided by OpenJDK. We will install OpenJDK 11 which is the latest LTS release.
To install OpenJDK 11, update the package lists.
$ sudo apt update
Then run the following command to install OpenJDK 11.
$ sudo apt install openjdk-11-jdk -y

To confirm the version of Java installed, run the command:
$ java -version

Step 2) Download and install Apache Tomcat
With the installation of Java out of the way, our next step is to download and install Apache Tomcat. At the time of penning down this guide, the latest version of Apache Tomcat is v10.0.18.
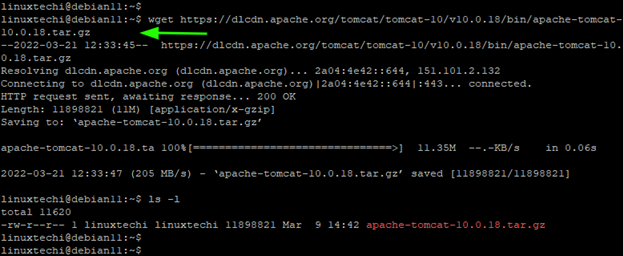
Visit the official Apache Tomcat download page and grab the latest binary or use the wget command as follows.
$ wget https://downloads.apache.org/tomcat/tomcat-10/v10.0.18/bin/apache-tomcat-10.0.18.tar.gz
Next, create a directory in the /opt directory.
$ sudo mkdir /opt/tomcat
Next, extract the binary file with tar command in the /opt/tomcat path.
$ sudo tar -xvf apache-tomcat-10*tar.gz -C /opt/tomcat --strip-components=1
Step 3) Create a new user and group for Tomcat
It’s generally not a good idea to test web applications using the root user since the user can easily be compromised by an attacker leading to a system breach.
Considering that, we are going to create a non-root user that will have access to the /opt/tomcat directory.
Therefore, create a group called tomcat.
$ sudo groupadd tomcat
Next, create the tomcat user and add the user to the tomcat group with /opt/tomcat as the home directory.
$ sudo useradd -s /bin/false -g tomcat -d /opt/tomcat tomcat
Step 4) Configure user permissions
Moving on, we are going to set the following ownership and permissions to the /opt/tomcat directory with chown and chomd command respectively.
$ sudo chown -R tomcat: /opt/tomcat
$ sudo sh -c 'chmod +x /opt/tomcat/bin/*.sh'
Step 5) Create a systemd file for Apache Tomcat
We need to make Apache Tomcat run in the background as a systemd service that can be started, stopped, and enabled. By default, Tomcat doesn’t come with a systemd unit file, and therefore, we are going to manually create it as follows.
$ sudo vi /etc/systemd/system/tomcat.service
Paste the following block of code which defines the systemd service file.
[Unit]
Description=Tomcat webs servlet container
After=network.target
[Service]
Type=forking
User=tomcat
Group=tomcat
RestartSec=10
Restart=always
Environment="JAVA_HOME=/usr/lib/jvm/java-1.11.0-openjdk-amd64"
Environment="JAVA_OPTS=-Djava.awt.headless=true -Djava.security.egd=file:/dev/./urandom"
Environment="CATALINA_BASE=/opt/tomcat"
Environment="CATALINA_HOME=/opt/tomcat"
Environment="CATALINA_PID=/opt/tomcat/temp/tomcat.pid"
Environment="CATALINA_OPTS=-Xms512M -Xmx1024M -server -XX:+UseParallelGC"
ExecStart=/opt/tomcat/bin/startup.sh
ExecStop=/opt/tomcat/bin/shutdown.sh
[Install]
WantedBy=multi-user.target
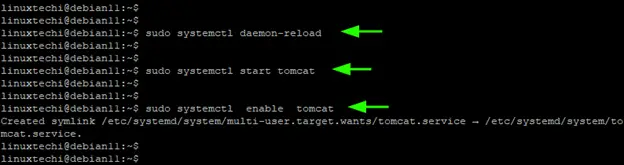
Save the changes and exit the file. Then rerun the systemd generator and reload all the unit files.
$ sudo systemctl daemon-reload
To confirm the default path for Java, run the command
$ sudo update-java-alternatives -l

This coincides with the path specified in the systemd service file which means we are on the right track.
Step 6) Enable and Start Tomcat daemon
With Tomcat’s systemd file in place, start the Apache Tomcat daemon and enable it to start on system startup.
$ sudo systemctl daemon-reload
$ sudo systemctl start tomcat
$ sudo systemctl enable tomcat
Then verify that Apache Tomcat is running
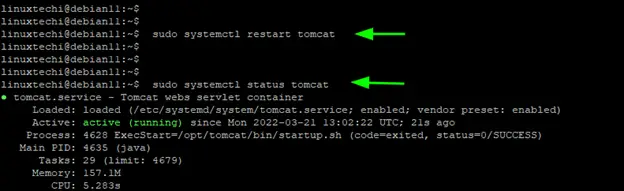
$ systemctl status tomcat

From the output, we can see that the Tomcat daemon is running, which implies our configuration is okay.
Step 7) Add Tomcat Admin user and configure roles
We need to configure an Administrative user to access the ‘server status’, ‘host manager’ and ‘manager app’ sections on Tomcat’s web page. Otherwise, we will run into an error on the browser.
To do so, we will edit the Tomcat user configuration file.
$ sudo vi /opt/tomcat/conf/tomcat-users.xml
Paste the following lines of code just before the </tomcat-users> tag. Feel free to specify your own username and password values.
<role rolename="admin"/>
<role rolename="admin-gui"/>
<role rolename="manager"/>
<role rolename="manager-gui"/>
<user username="linuxtechi" password="<enetr-password-here>" roles="admin,admin-gui,manager,manager-gui"/>

Save the changes and close configuration file.
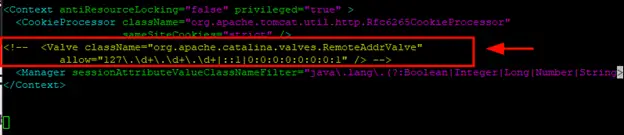
Step 8) Manage remote access to Apache Tomcat
By default, you can only access Tomcat’s web interface from the host system. We, therefore, need to configure remote access to Tomcat Manager by manually editing the context.xml configuration file.
$ sudo vi /opt/tomcat/webapps/manager/META-INF/context.xml
Scroll down and comment these lines by simply adding <!– at the beginning and –> at the end.
<!-- <Valve className="org.apache.catalina.valves.RemoteAddrValve"
allow="127.d+.d+.d+|::1|0:0:0:0:0:0:0:1" /> -->
Save the file and exit. Next, we need to allow remote access to Host Manager. So, edit the Host manager’s context.xml file.
$ sudo vi /opt/tomcat/webapps/host-manager/META-INF/context.xml
Again, comment out the following block of text by adding <!– at the beginning and –> at the end.
<!-- <Valve className="org.apache.catalina.valves.RemoteAddrValve"
allow="127.d+.d+.d+|::1|0:0:0:0:0:0:0:1" /> -->

Save the changes and exit the configuration file. To apply all the changes made, restart Tomcat.
$ sudo systemctl restart tomcat
Step 9) Access to Apache Tomcat
Tomcat is now fully configured and can be accessed remotely. There’s one more step remaining. If you are running a UFW firewall, consider opening port 8080 which is the default port that Apache Tomcat listens on.
$ sudo ufw allow 8080
$ sudo ufw reload
Finally, to access Tomcat’s web interface, launch your browser and head over to the following address.
http://server-ip-addres:8080
or
http://youdomain.com:8080
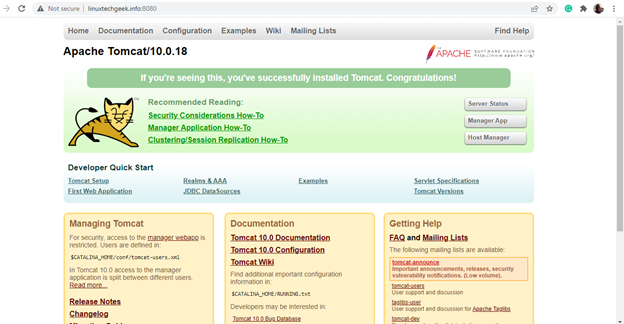
This should take you to the default home page for Tomcat webserver as shown.
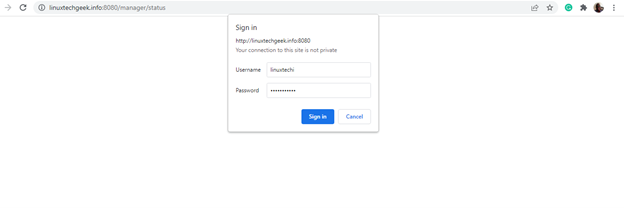
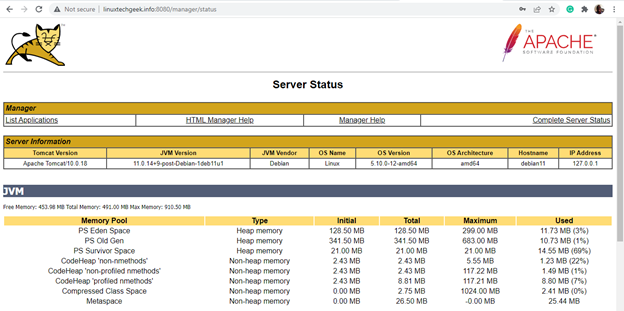
To access the ‘Server status’ page, click on ‘Server status’. A pop-up will appear prompting for user credentials. Provide the Admin login credentials specified in Step 6 and click ‘Sign In’.
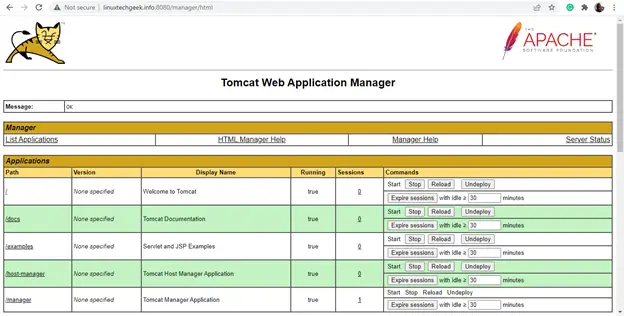
Similarly, you will be prompted for the same credentials when accessing the Tomcat Application Manager which can be accessed by clicking on ‘Manager App’ on the default web interface.
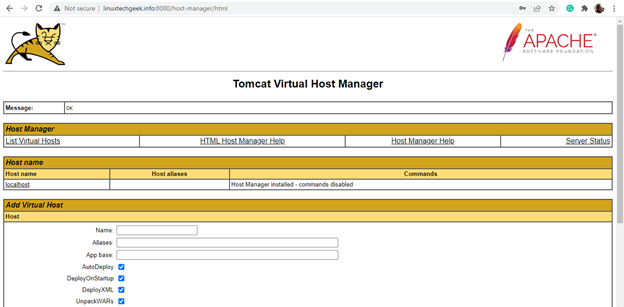
Clicking on the ‘Host Manager’ will take you to the Virtual Host Manager section as shown.
Conclusion
And it’s a wrap. In this guide, we walked you through the installation on Apache Tomcat web server on Debian 11. All the best in hosting your Java applications!
The post How to Install Apache Tomcat on Debian 11 (Step by Step) first appeared on LinuxTechi.