
How to Install Kubernetes Cluster on Ubuntu 22.04
Are you looking for an easy guide on how to install Kubernetes Cluster on Ubuntu 22.04 (Jammy Jellyfish)?
The step-by-step guide on this page will show you how to install Kubernetes cluster on Ubuntu 22.04 using Kubeadm command step by step.
Kubernetes is a free and open-source container orchestration tool, it also known as k8s. With the help of Kubernetes, we can achieve automated deployment, scaling and management of containerized application.
A Kubernetes cluster consists of worker nodes on which application workload is deployed and a set up master nodes which are used to manage worker nodes and pods in the cluster.
In this guide, we are using one master node and two worker nodes. Following are system requirements on each node,
- Minimal install Ubuntu 22.04
- Minimum 2GB RAM or more
- Minimum 2 CPU cores / or 2 vCPU
- 20 GB free disk space on /var or more
- Sudo user with admin rights
- Internet connectivity on each node
Lab Setup
- Master Node: 192.168.1.173 – k8smaster.example.net
- First Worker Node: 192.168.1.174 – k8sworker1.example.net
- Second Worker Node: 192.168.1.175 – k8sworker2.example.net
Without any delay, let’s jump into the installation steps of Kubernetes cluster
Step 1) Set hostname and add entries in the hosts file
Login to to master node and set hostname using hostnamectl command,
$ sudo hostnamectl set-hostname "k8smaster.example.net"
$ exec bash
On the worker nodes, run
$ sudo hostnamectl set-hostname "k8sworker1.example.net"   // 1st worker node
$ sudo hostnamectl set-hostname "k8sworker2.example.net"   // 2nd worker node
$ exec bash
Add the following entries in /etc/hosts file on each node
192.168.1.173   k8smaster.example.net k8smaster
192.168.1.174   k8sworker1.example.net k8sworker1
192.168.1.175   k8sworker2.example.net k8sworker2
Step 2) Disable swap & add kernel settings
Execute beneath swapoff and sed command to disable swap. Make sure to run the following commands on all the nodes.
$ sudo swapoff -a
$ sudo sed -i '/ swap / s/^(.*)$/#1/g' /etc/fstab
Load the following kernel modules on all the nodes,
$ sudo tee /etc/modules-load.d/containerd.conf <<EOF
overlay
br_netfilter
EOF
$ sudo modprobe overlay
$ sudo modprobe br_netfilter
Set the following Kernel parameters for Kubernetes, run beneath tee command
$ sudo tee /etc/sysctl.d/kubernetes.conf<<EOF
net.bridge.bridge-nf-call-ip6tables = 1
net.bridge.bridge-nf-call-iptables = 1
net.ipv4.ip_forward = 1
EOF
Reload the above changes, run
$ sudo sysctl --system
Step 3) Install containerd run time
In this guide, we are using containerd run time for our Kubernetes cluster. So, to install containerd, first install its dependencies.
$ sudo apt install -y curl gnupg2 software-properties-common apt-transport-https ca-certificates
Enable docker repository
$ curl -fsSL https://download.docker.com/linux/ubuntu/gpg | sudo apt-key add -
$ sudo add-apt-repository "deb [arch=amd64] https://download.docker.com/linux/ubuntu $(lsb_release -cs) stable"
Now, run following apt command to install containerd
$ sudo apt update
$ sudo apt install -y containerd.io
Configure containerd so that it starts using systemd as cgroup.
$ containerd config default | sudo tee /etc/containerd/config.toml >/dev/null 2>&1
$ sudo sed -i 's/SystemdCgroup = false/SystemdCgroup = true/g' /etc/containerd/config.toml
Restart and enable containerd service
$ sudo systemctl restart containerd
$ sudo systemctl enable containerd
Step 4) Add apt repository for Kubernetes
Execute following commands to add apt repository for Kubernetes
$ curl -s https://packages.cloud.google.com/apt/doc/apt-key.gpg | sudo apt-key add -
$ sudo apt-add-repository "deb http://apt.kubernetes.io/ kubernetes-xenial main"
Note: At time of writing this guide, Xenial is the latest Kubernetes repository but when repository is available for Ubuntu 22.04 (Jammy Jellyfish) then you need replace xenial word with ‘jammy’ in ‘apt-add-repository’ command.
Step 5) Install Kubernetes components Kubectl, kubeadm & kubelet
Install Kubernetes components like kubectl, kubelet and Kubeadm utility on all the nodes. Run following set of commands,
$ sudo apt update
$ sudo apt install -y kubelet kubeadm kubectl
$ sudo apt-mark hold kubelet kubeadm kubectl
Step 6) Initialize Kubernetes cluster with Kubeadm command
Now, we are all set to initialize Kubernetes cluster. Run the following Kubeadm command from the master node only.
$ sudo kubeadm init --control-plane-endpoint=k8smaster.example.net
Output of above command,
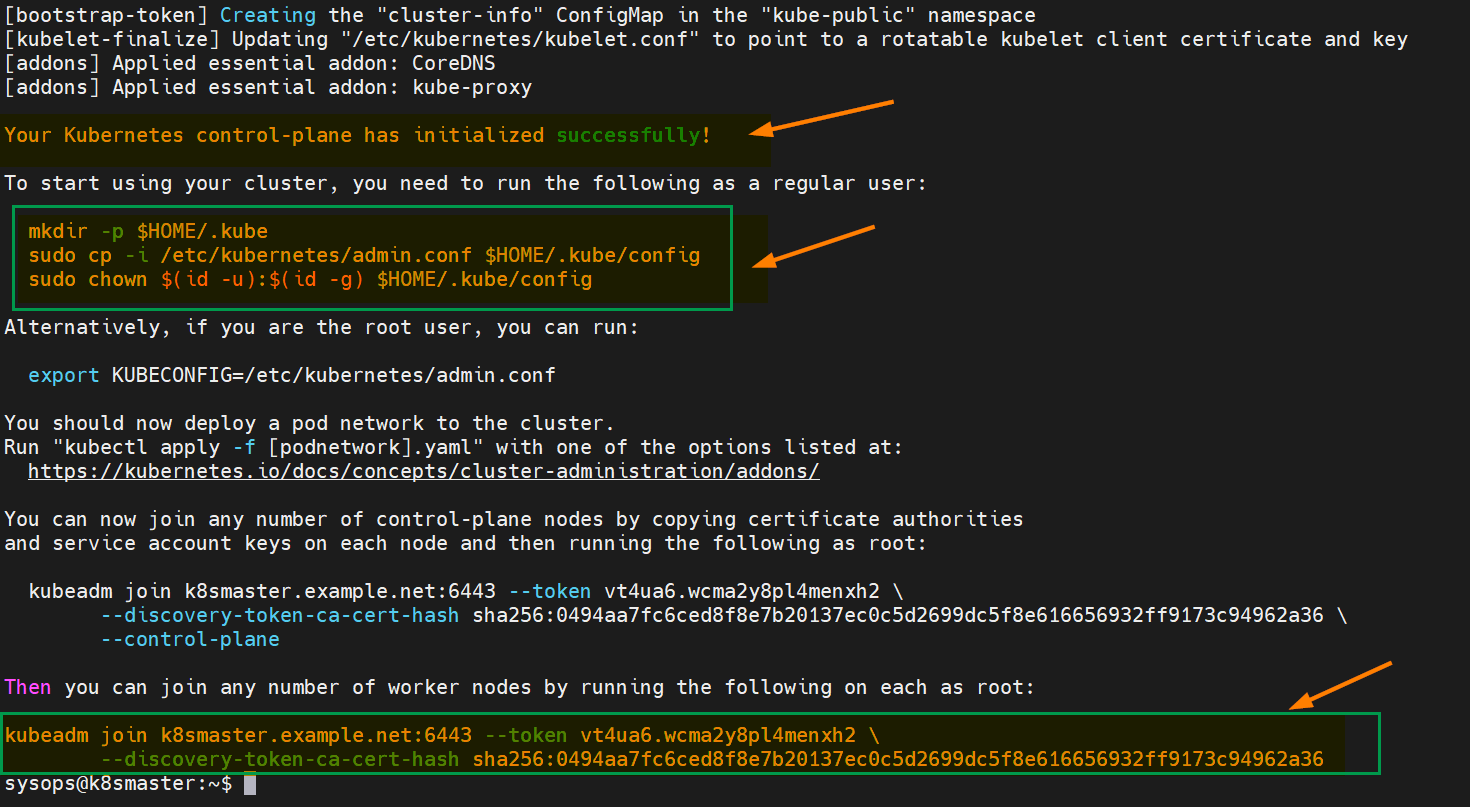
As the output above confirms that control-plane has been initialize successfully. In output also we are getting set of commands for interacting the cluster and also the command for worker node to join the cluster.
So, to start interacting with cluster, run following commands from the master node,
$ mkdir -p $HOME/.kube
$ sudo cp -i /etc/kubernetes/admin.conf $HOME/.kube/config
$ sudo chown $(id -u):$(id -g) $HOME/.kube/config
Now, try to run following kubectl commands to view cluster and node status
$ kubectl cluster-info
$ kubectl get nodes
Output,

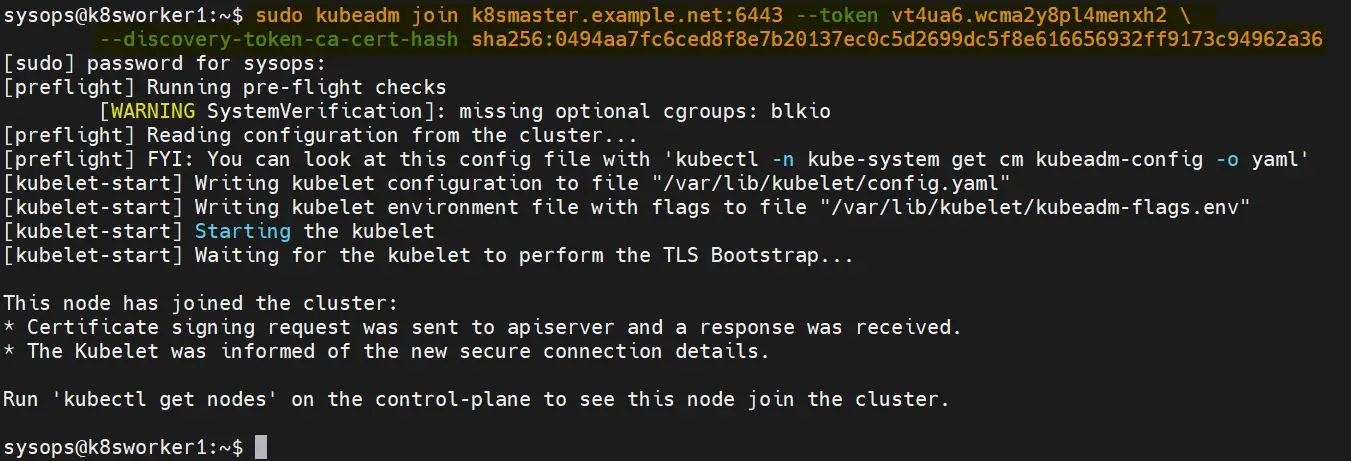
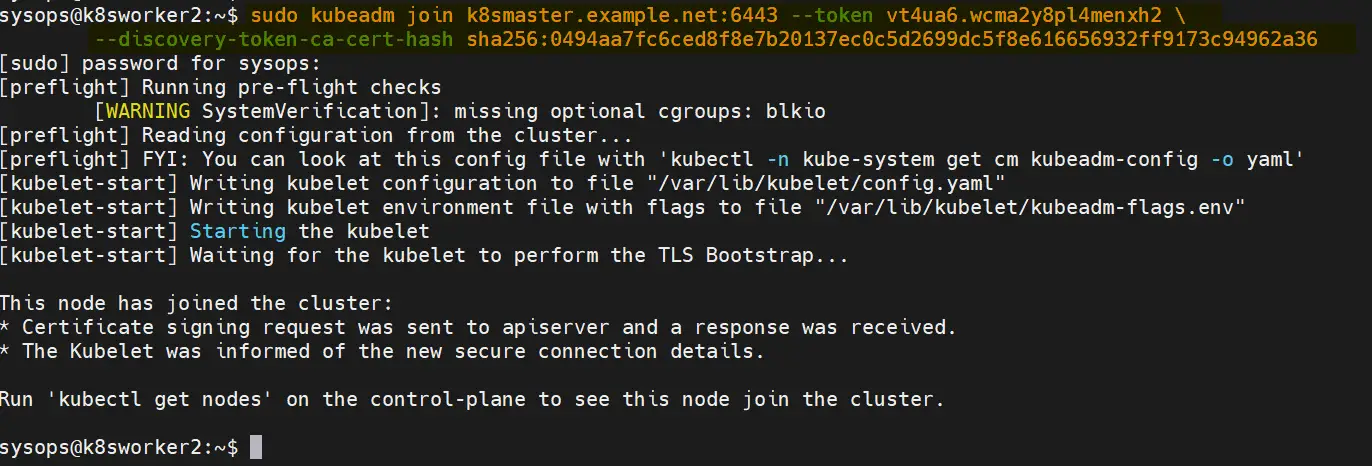
Join both the worker nodes to the cluster, command is already there is output, just copy paste on the worker nodes,
$ sudo kubeadm join k8smaster.example.net:6443 --token vt4ua6.wcma2y8pl4menxh2
   --discovery-token-ca-cert-hash sha256:0494aa7fc6ced8f8e7b20137ec0c5d2699dc5f8e616656932ff9173c94962a36
Output from both the worker nodes,
Check the nodes status from master node using kubectl command,
$ kubectl get nodes

As we can see nodes status is ‘NotReady’, so to make it active. We must install CNI (Container Network Interface) or network add-on plugins like Calico, Flannel and Weave-net.
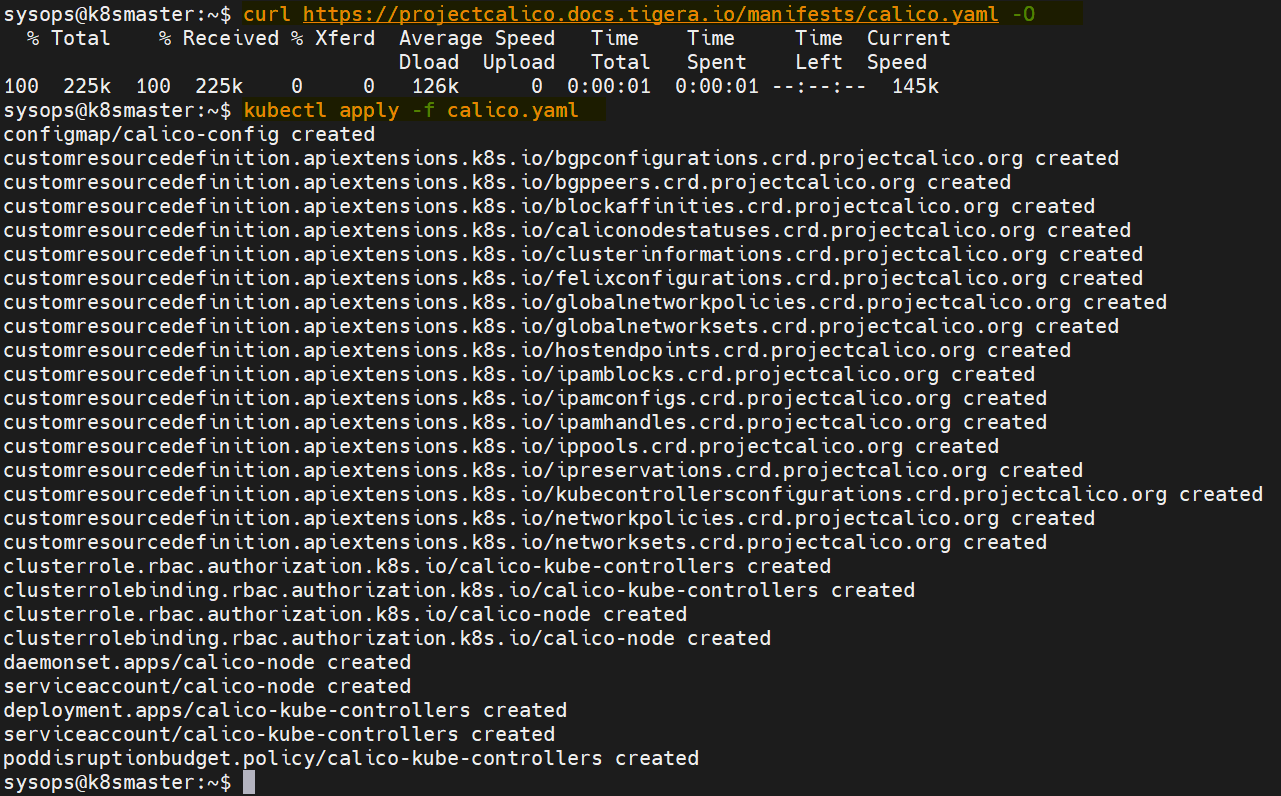
Step 6) Install Calico Pod Network Add-on
Run following curl and kubectl command to install Calico network plugin from the master node,
$ curl https://projectcalico.docs.tigera.io/manifests/calico.yaml -O
$ kubectl apply -f calico.yaml
Output of above commands would look like below,
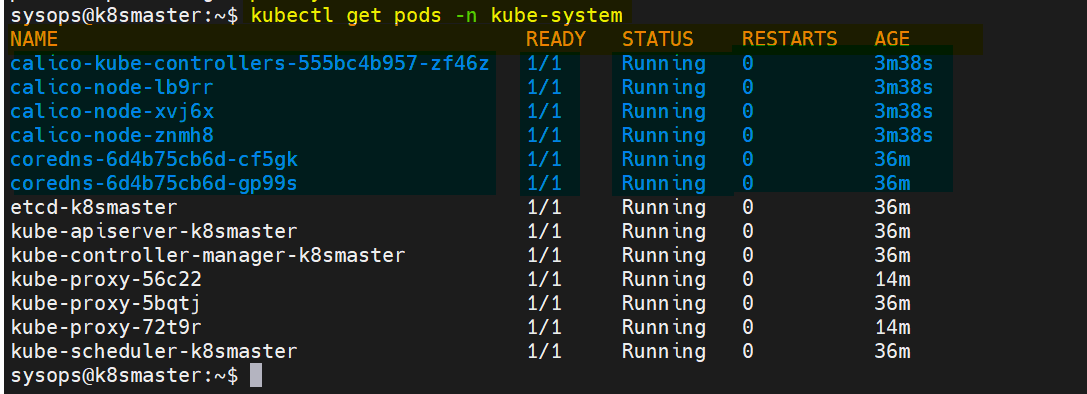
Verify the status of pods in kube-system namespace,
$ kubectl get pods -n kube-system
Output,
Perfect, check the nodes status as well.
$ kubectl get nodes

Great, above confirms that nodes are active node. Now, we can say that our Kubernetes cluster is functional.
Step 7) Test Kubernetes Installation
To test Kubernetes installation, let’s try to deploy nginx based application and try to access it.
$ kubectl create deployment nginx-app --image=nginx --replicas=2
Check the status of nginx-app deployment
$ kubectl get deployment nginx-app
NAME        READY   UP-TO-DATE   AVAILABLE   AGE
nginx-app   2/2     2            2           68s
$
Expose the deployment as NodePort,
$ kubectl expose deployment nginx-app --type=NodePort --port=80
service/nginx-app exposed
$
Run following commands to view service status
$ kubectl get svc nginx-app
$ kubectl describe svc nginx-app
Output of above commands,

Use following command to access nginx based application,
$ curl http://<woker-node-ip-addres>:31246
$ curl http://192.168.1.174:31246
Output,
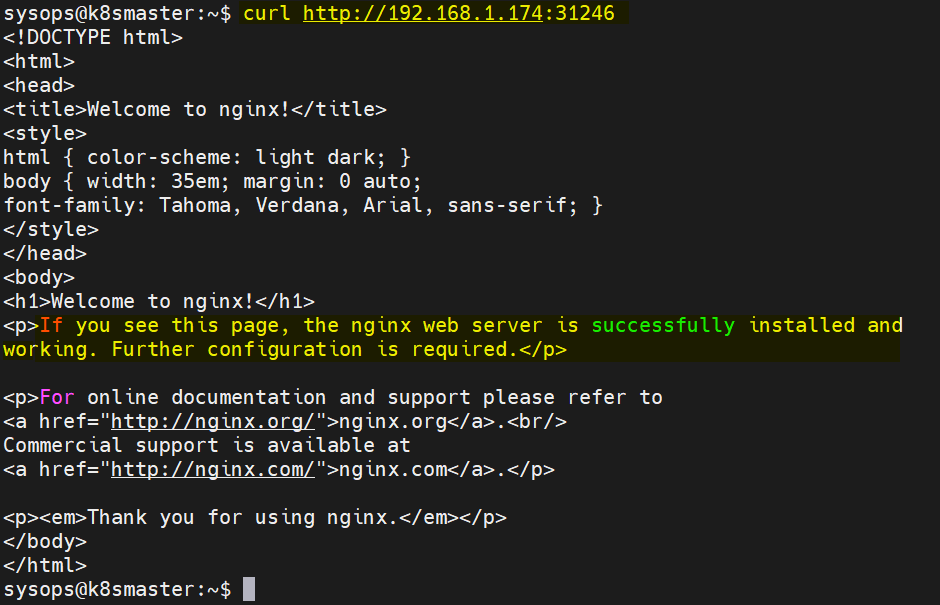
Great, above output confirms that nginx based application is accessible.
That’s all from this guide, I hope you have found this guide useful. Kindly do post your queries and feedback in below comments section.
Also Read: How to Configure Static IP Address on Ubuntu 22.04 LTS
The post How to Install Kubernetes Cluster on Ubuntu 22.04 first appeared on .