
How to Install Minikube on Ubuntu 20.04 LTS / 21.04
As the name suggests, minikube is a single node Kubernetes (k8s) cluster. Anyone who is new to the Kubernetes and wants to learn and try deploying application on it, then minikube is the solution. Minikube provides a command line interface to manage Kubernetes (k8s) cluster and its component.
In this article we will cover the installation of Minikube on Ubuntu 20.04 LTS / 21.04.
Minimum system requirements for minikube
- 2 GB RAM or more
- 2 CPU / vCPU or more
- 20 GB free hard disk space or more
- Docker / Virtual Machine Manager – KVM & VirtualBox
Note: In this article, I will be using Docker container as a base for minikube. In case, docker is not installed on your ubuntu system then use following URL to install it.
- How to Install and Use Docker on Ubuntu 20.04 / 20.10
Prerequisites for minikube
- Minimal Ubuntu 20.04 LTS / 21.04
- Sudo User with root privileges
- Stable Internet Connection
Let’s dive into the Minikube Installation steps on Ubuntu 20.04 LTS / 21.04
Step 1) Apply updates
Apply all updates of existing packages of your system by executing the following apt commands,
$ sudo apt update -y
$ sudo apt upgrade -y
Once all the updates are installed then reboot your system once.
Step 2) Install Minikube dependencies
Install the following minikube dependencies by running beneath command,
$ sudo apt install -y curl wget apt-transport-https
Step 3) Download Minikube Binary
Use the following wget command to download latest minikube binary,
$ wget https://storage.googleapis.com/minikube/releases/latest/minikube-linux-amd64
Once the binary is downloaded, copy it to the path /usr/local/bin and set the executable permissions on it
$ sudo cp minikube-linux-amd64 /usr/local/bin/minikube
$ sudo chmod +x /usr/local/bin/minikube
Verify the minikube version
$ minikube version
minikube version: v1.21.0
commit: 76d74191d82c47883dc7e1319ef7cebd3e00ee11
$
Note: At the time of writing this tutorial, latest version of minikube is v1.21.0.
Step 4) Install Kubectl utility
Kubectl is a command utility which is used to interact with Kubernetes cluster for managing deployments, service and pods etc. Use below curl command to download latest version of kubectl.
$ curl -LO https://storage.googleapis.com/kubernetes-release/release/`curl -s https://storage.googleapis.com/kubernetes-release/release/stable.txt`/bin/linux/amd64/kubectl
Once kubectl is downloaded then set the executable permissions on kubectl binary and move it to the path /usr/local/bin.
$ chmod +x kubectl
$ sudo mv kubectl /usr/local/bin/
Now verify the kubectl version
$ kubectl version -o yaml

Step 4) Start the minikube
As we are already stated in the beginning that we would be using docker as base for minikue, so start the minikube with the docker driver,
$ minikube start --driver=docker
Output would like below,

Perfect, above confirms that minikube cluster has been configured and started successfully.
Run below minikube command to check status,
pkumar@linuxtechi:~$ minikube status
minikube
type: Control Plane
host: Running
kubelet: Running
apiserver: Running
kubeconfig: Configured
pkumar@linuxtechi:~$
Run following kubectl command to verify the Kubernetes version, node status and cluster info.
$ kubectl cluster-info
$ kubectl get nodes
Output of above commands would like below:

Step 5) Managing Addons on minikube
By default, only couple of addons are enabled during minikube installation, to see the addons of minikube, run the below command.
$ minikube addons list

If you wish to enable any addons run the below minikube command,
$ minikube addons enable <addon-name>
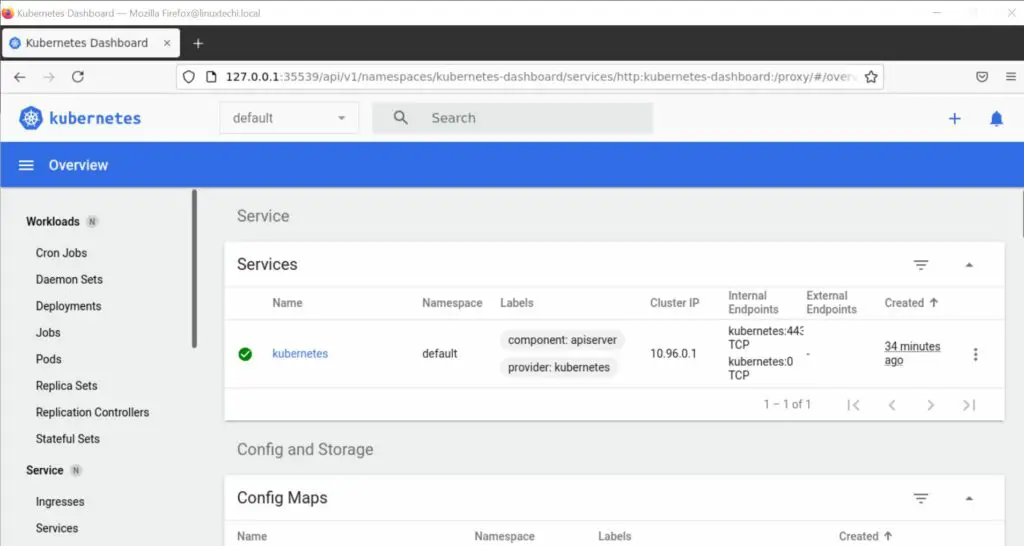
Let’s assume we want to enable and access kubernetes dashboard , run
$ minikube dashboard
It will open the Kubernetes dashboard in the web browser.

To enable Ingress controller addon, run
$ minikube addons enable ingress

Step 6) Verify Minikube Installation
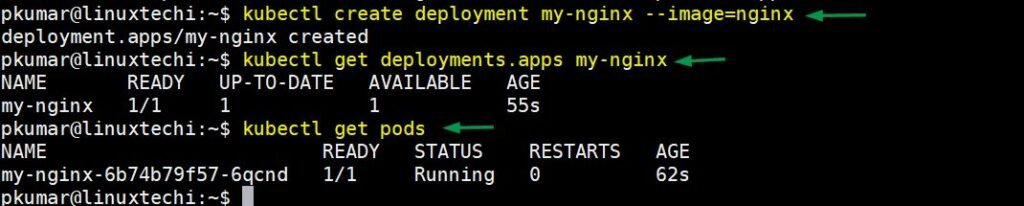
To verify the minikube installation, let’s try to deploy nginx based deployment.
Run below kubectl command to install nginx based deployment.
$ kubectl create deployment my-nginx --image=nginx
Run following kubectl command to verify deployment status
$ kubectl get deployments.apps my-nginx
$ kubectl get pods
Output of above commands would look like below:
Expose the deployment using following command,
$ kubectl expose deployment my-nginx --name=my-nginx-svc --type=NodePort --port=80
$ kubectl get svc my-nginx-svc
Use below command to get your service url,
$ minikube service my-nginx-svc --url
http://192.168.49.2:31895
$
Now try to access your nginx based deployment using above url,
$ curl http://192.168.49.2:31895
Output,
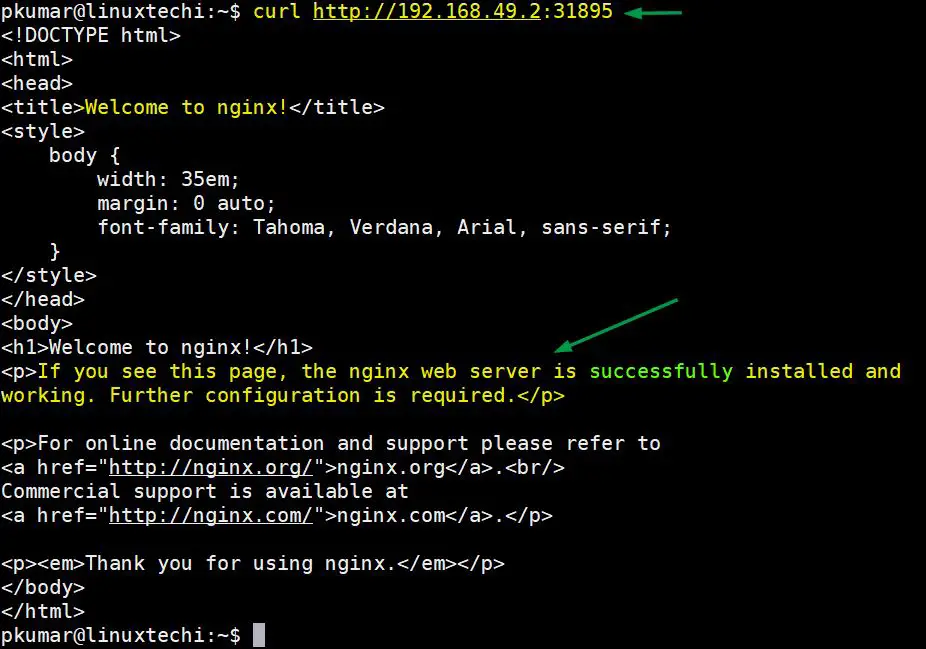
Great, above confirms that NGINX application is accessible.
Step 7) Managing Minikube Cluster
To stop the minikube, run
$ minikube stop
To delete the minikube, run
$ minikube delete
To Start the minikube, run
$ minikube start
In case you want to start the minikube with higher resource like 8 GB RM and 4 CPU then execute following commands one after the another.
$ minikube config set cpus 4
$ minikube config set memory 8192
$ minikube delete
$ minikube start
That’s all from this tutorial, I hope you have learned how to install Minikube on Ubuntu 20.04 / 21.04 system. Please don’t hesitate to share your feedback and comments.
Recommended Read : How to Install and Use Helm in Kubernetes
The post How to Install Minikube on Ubuntu 20.04 LTS / 21.04 first appeared on LinuxTechi.