
How to Install PostgreSQL 15 on Ubuntu 22.04 Step-by-Step
In this article, we will explain how to install PostgreSQL 15 database server on Ubuntu 22.04 (Jammy Jellyfish).
PostgreSQL is a powerful, open-source object-relational Database Management System (DBMS). It’s been battle-tested for over 35 years which has earned it a strong reputation for reliability and performance. This feature-rich database is used by many tech giants, such as Apple, IMDB, Instagram, and so on.
PostgreSQL supports large number of the SQL standard and is constructed to be extensible by users in many aspects. Some of the salient features include ACID transactions, foreign keys, subqueries, triggers, user-defined types, functions, etc.
Prerequisites
Before installing the PostgreSQL server, we must ensure that the system meets the following installation requirements:
- Pre-Installed Ubuntu 22.04
- A regular user with sudo rights
- An active internet connection
- At least 2 GB of RAM with an additional 512 MB of disk space. Please note that this is a minimal requirement for the demo environment. The actual hardware configuration will vary with data volume.
Without any further delay, let’s deep dive into PostgreSQL 15 installation steps,
1) Enable PostgreSQL Package Repository
PostgreSQL 15 package is not available in the default package repository, so enable its official package repository using following commands.
$ sudo sh -c 'echo "deb http://apt.postgresql.org/pub/repos/apt $(lsb_release -cs)-pgdg main" > /etc/apt/sources.list.d/pgdg.list'
$ wget -qO- https://www.postgresql.org/media/keys/ACCC4CF8.asc | sudo tee /etc/apt/trusted.gpg.d/pgdg.asc &>/dev/null
To begin, let’s fetch the latest versions of the packages. We can achieve this using the apt update command as shown below:
$ sudo apt update
The above command will take a few seconds to complete.
2) Install PostgreSQL 15 Database Server and Client
The postgresql package installs the default version of the PostgreSQL database server whereas the postgresql-client package installs the client utility.
Let’s install the PostgreSQL client and server interactively using the below apt command:
$ sudo apt install postgresql postgresql-client -y
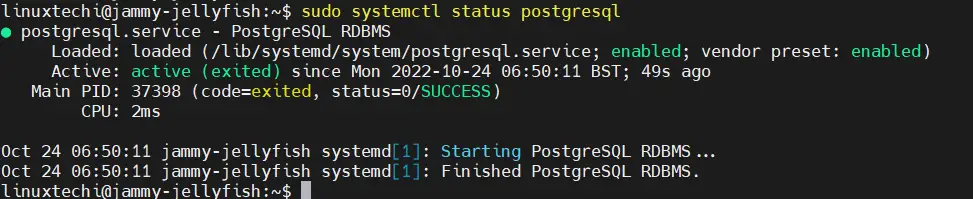
Next, let’s verify that the PostgreSQL service is up and running:
$ sudo systemctl status postgresql
Finally, check the PostgreSQL version using the psql command line utility:
$ psql --version
Here, we can see that the version of PostgreSQL is 15.

3) Update PostgreSQL Admin User Password
By default, we can connect to the PostgreSQL server without using any password. Let’s see this in action using the psql utility:
$ sudo -u postgres psql
postgres=#
In the above output, the postgres=# prompt indicated the active connection with the PostgreSQL server.
In this example, we have used the postgres user. This is an admin user of PostgreSQL and it gets created during the installation process.
Allowing administrative access to the database without any password isn’t a good idea. So, let’s set the password for the postgres user:
postgres=# ALTER USER postgres PASSWORD 'demoPassword';
The above SQL query sets the user password to demoPassword. Please note that, we have used a very simple password because this is a demo environment. However, the same is not recommended in the production environment.
Let’s verify that the password has been set successfully. So first, terminate the current session with the server using the q command.
postgres=# q
Output of above commands,

Now, let’s connect to the database server again:
$ psql -h localhost -U postgres
Let’s enter the demoPassword string as a password and now we are connected to the database.

4) Configure PostgreSQL to Allow Remote Connections
By default, PostgreSQL accepts connections from the localhost only. However, we can easily modify the configuration to allow connection from remote clients.
PostgreSQL reads its configuration from the postgresql.conf file which is located in the /etc/postgresql/<version>/main/ directory. Here, the version indicates the major version of PostgreSQL.
For example, in our case the full path of the file is /etc/postgresql/15/main/postgresql.conf.
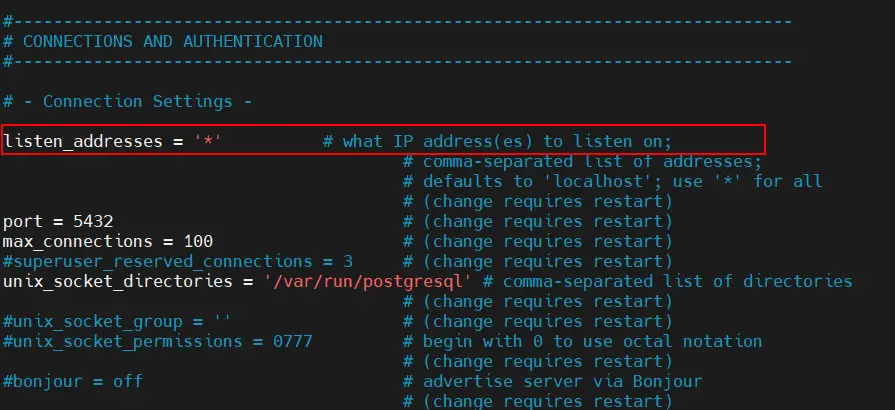
Now, open the postgresql.conf file in a text editor, uncomment the line that starts with the listen_addresses, and replace ‘localhost’ with ‘*’.
This setting is located under the CONNECTIONS AND AUTHENTICATION section. After modification the file will look like this:
Save and close the file.
Next, edit the IPv4 local connections section of the pg_hba.conf file to allow IPv4 connections from all clients. Please note that this file is also located in /etc/postgresql/15/main/ directory.
$ sudo vi /etc/postgresql/15/main/pg_hba.conf
After modification the file will look like this:
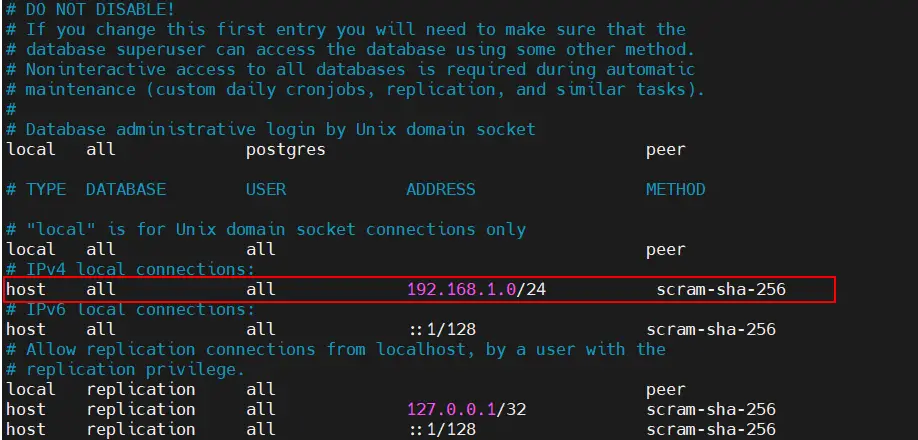
In the above configuration indicates to allow connection from the network 192.168.1.0/24
In case, Ubuntu firewall is running on your system then allow PostgreSQL 5432 port using following command,
$ sudo ufw allow 5432/tcp
Verifying Remote Connection
Finally, restart the service and verify it’s up and running:
$ sudo systemctl restart postgresql
$ sudo systemctl status postgresql
Now, let’s try to access DB from remote client.
$ psql -h 192.168.1.192 -U postgres
In this example, 192.168.1.192 is the IP address of the PostgreSQL database server.

Here we can see that we are able to access DB from the remote client.
That’s all from this article.Please do post your queries and feedback in the below comments section.
Read Also: How to Set Static IP Address on Ubuntu Server 22.04
The post How to Install PostgreSQL 15 on Ubuntu 22.04 Step-by-Step first appeared on .